
In the rapidly evolving landscape of engine manufacturing, I have witnessed firsthand the intense pressure to reduce development cycles, enhance quality, and control costs. The global market demands agility, especially for complex components like bimetallic engine blocks, which feature intricate geometries, thin walls, and embedded materials such as iron sleeves. Traditional methods, reliant on costly and time-consuming模具 (molds), struggle to meet these demands, particularly during prototype stages or for low-volume production. Through my work, I have explored the fusion of additive manufacturing with precision lost wax casting—a synergistic approach that dramatically accelerates the creation of high-integrity castings. This article delves into my practical experience in applying 3D printing, specifically Selective Laser Sintering (SLS), to enable rapid,模具-less precision lost wax casting for dual-metal engine blocks, emphasizing how this integration overcomes longstanding barriers in foundry practice.
The core challenge lies in the engine block’s design: dimensions approximately 355 mm × 332 mm × 298 mm, with minimum wall thicknesses of 3 mm, internal complexities, and stringent surface quality requirements. Conventional precision lost wax casting, while capable of producing excellent surface finishes and dimensional accuracy, typically requires weeks or months to produce wax patterns via injection molding tools. Any design iteration necessitates tooling modifications, leading to extended lead times and high upfront costs. In contrast, 3D printing allows for direct digital fabrication of patterns, slashing the pattern production phase to mere days. My focus has been on leveraging SLS to produce polystyrene (PS) patterns that are subsequently used in precision lost wax casting processes, thereby merging the flexibility of additive manufacturing with the metallurgical robustness of investment casting.
Selective Laser Sintering operates on the principle of layer-wise material consolidation. The process begins with a 3D CAD model, which is computationally sliced into discrete layers, typically 0.1 to 0.2 mm thick. A thin layer of polymer powder, such as PS, is spread across a build platform. A CO₂ laser then selectively scans the cross-section of the part, sintering the powder particles together. The unsintered powder remains loose, providing natural support for overhanging features. After each layer, the platform descends, a new powder layer is applied, and the process repeats until the complete part is formed. Post-processing involves removing the loose powder and often infiltrating the part with wax to improve surface quality and handling strength for precision lost wax casting. The SLS process parameters critically influence the final pattern quality. In my projects, I optimize these parameters through systematic experimentation, as summarized in Table 1.
| Parameter | Typical Value Range | Influence on Pattern Quality |
|---|---|---|
| Layer Thickness | 0.10 – 0.15 mm | Affects surface roughness and build time; thinner layers yield smoother surfaces but increase time. |
| Laser Power | 30 – 40 W | Determines sintering depth and strength; insufficient power leads to weak bonds, excess can cause distortion. |
| Scan Speed | 1800 – 2200 mm/s | Impacts energy density; higher speeds may reduce density, lower speeds risk overheating. |
| Beam Offset | 0.05 – 0.10 mm | Compensates for laser beam diameter to achieve accurate dimensions. |
| Powder Pre-heat Temperature | 70 – 90 °C | Reduces thermal gradients and curl distortion; critical for large, flat parts. |
The energy input during sintering can be modeled using the following simplified relation for laser energy density \( E_d \):
$$ E_d = \frac{P}{v \cdot h \cdot \delta} $$
where \( P \) is the laser power (W), \( v \) is the scan speed (mm/s), \( h \) is the hatch spacing (mm), and \( \delta \) is the layer thickness (mm). Achieving a consistent \( E_d \) within an optimal window, typically between 0.2 and 0.4 J/mm² for PS, is crucial for fully dense, dimensionally stable patterns suitable for precision lost wax casting. Deviations can lead to porosity or warpage, which compromise the subsequent casting.
For the engine block, the SLS build orientation and support structure design are paramount. I typically orient the part to minimize the need for supports on critical surfaces, placing smaller, planar faces downward. However, for complex geometries like the block’s water jacket cavities, judicious support is necessary to prevent collapse during the build. Supports are designed as thin, web-like structures, often 1 mm thick and 20 mm tall, contouring the overhanging areas. After building, the pattern is carefully extracted from the powder bed, cleaned via compressed air, and then infiltrated with a proprietary wax blend. This wax infiltration seals surface porosity and enhances the pattern’s rigidity, making it robust enough for handling during the precision lost wax casting assembly process. The entire pattern fabrication, from CAD file to finished wax-infiltrated pattern, can be completed in under 20 hours—a fraction of the time required for conventional tooling.
Once the 3D-printed pattern is ready, the focus shifts to the precision lost wax casting process design. This is where computational simulation becomes indispensable. Using casting simulation software (e.g., based on finite element or finite volume methods), I analyze the solidification and feeding behavior to prevent defects such as shrinkage porosity, hot tears, and misruns. The simulation starts with identifying thermal hotspots—regions that solidify last due to higher volumetric heat content or poorer heat dissipation. For a complex shape like the engine block, the thermal field \( T(\mathbf{x}, t) \) during cooling is governed by the heat conduction equation:
$$ \rho C_p \frac{\partial T}{\partial t} = \nabla \cdot (k \nabla T) + \dot{q} $$
where \( \rho \) is density, \( C_p \) is specific heat, \( k \) is thermal conductivity, and \( \dot{q} \) is a latent heat source term accounting for phase change. By solving this equation numerically, I locate hotspots, often at junction points and thick sections. For the bimetallic block, the presence of the pre-heated iron sleeve (around 400°C) further complicates the thermal field, necessitating careful modeling of the interfacial heat transfer.
Based on the hotspot analysis, I design the gating and feeding system. The goal is to establish directional solidification towards the feeders (risers) and ensure adequate metal supply to compensate for shrinkage. The feeding efficiency can be assessed using the modulus method, where the feeding distance \( L_f \) is related to the section modulus \( M \) (volume-to-surface area ratio) and material properties. A simplified criterion for soundness is:
$$ L_f \leq C \cdot M $$
where \( C \) is a constant dependent on alloy and cooling conditions. For aluminum alloys like ZL101A (similar to A356), used for the block body, typical values of \( C \) range from 4 to 6. I calculate moduli for various sections and position feeders to cover all hotspots. The final rigging design includes multiple ingates, a sprue, and several feeders, all assembled onto a wax runner system. The entire cluster is then subjected to full-process simulation to validate the design. Key simulation outputs for the engine block are summarized in Table 2.
| Parameter | Value / Outcome | Remarks |
|---|---|---|
| Alloy | ZL101A (Al-Si-Mg) | Good castability, responds well to heat treatment. |
| Pouring Temperature | 700 ± 10 °C | Balances fluidity and reduced gas solubility. |
| Mold Temperature (Ceramic Shell) | 400 °C | Prevents premature chilling and promotes filling. |
| Iron Sleeve Preheat | 400 °C | Minimizes thermal shock and ensures metallurgical bond. |
| Simulated Fill Time | ~12 seconds | Ensures turbulent-free filling to avoid oxide entrapment. |
| Hotspot Locations | Lower crankcase areas, main bearing webs | Addressed with strategic feeder placement and chills. |
| Predicted Shrinkage Porosity | Negligible in critical regions | Confirms efficacy of feeding system design. |
The simulation provides confidence before committing to physical prototyping, reducing the risk of costly refabrication. It is an integral part of modern precision lost wax casting, especially when dealing with 3D-printed patterns where design changes can be quickly iterated digitally.
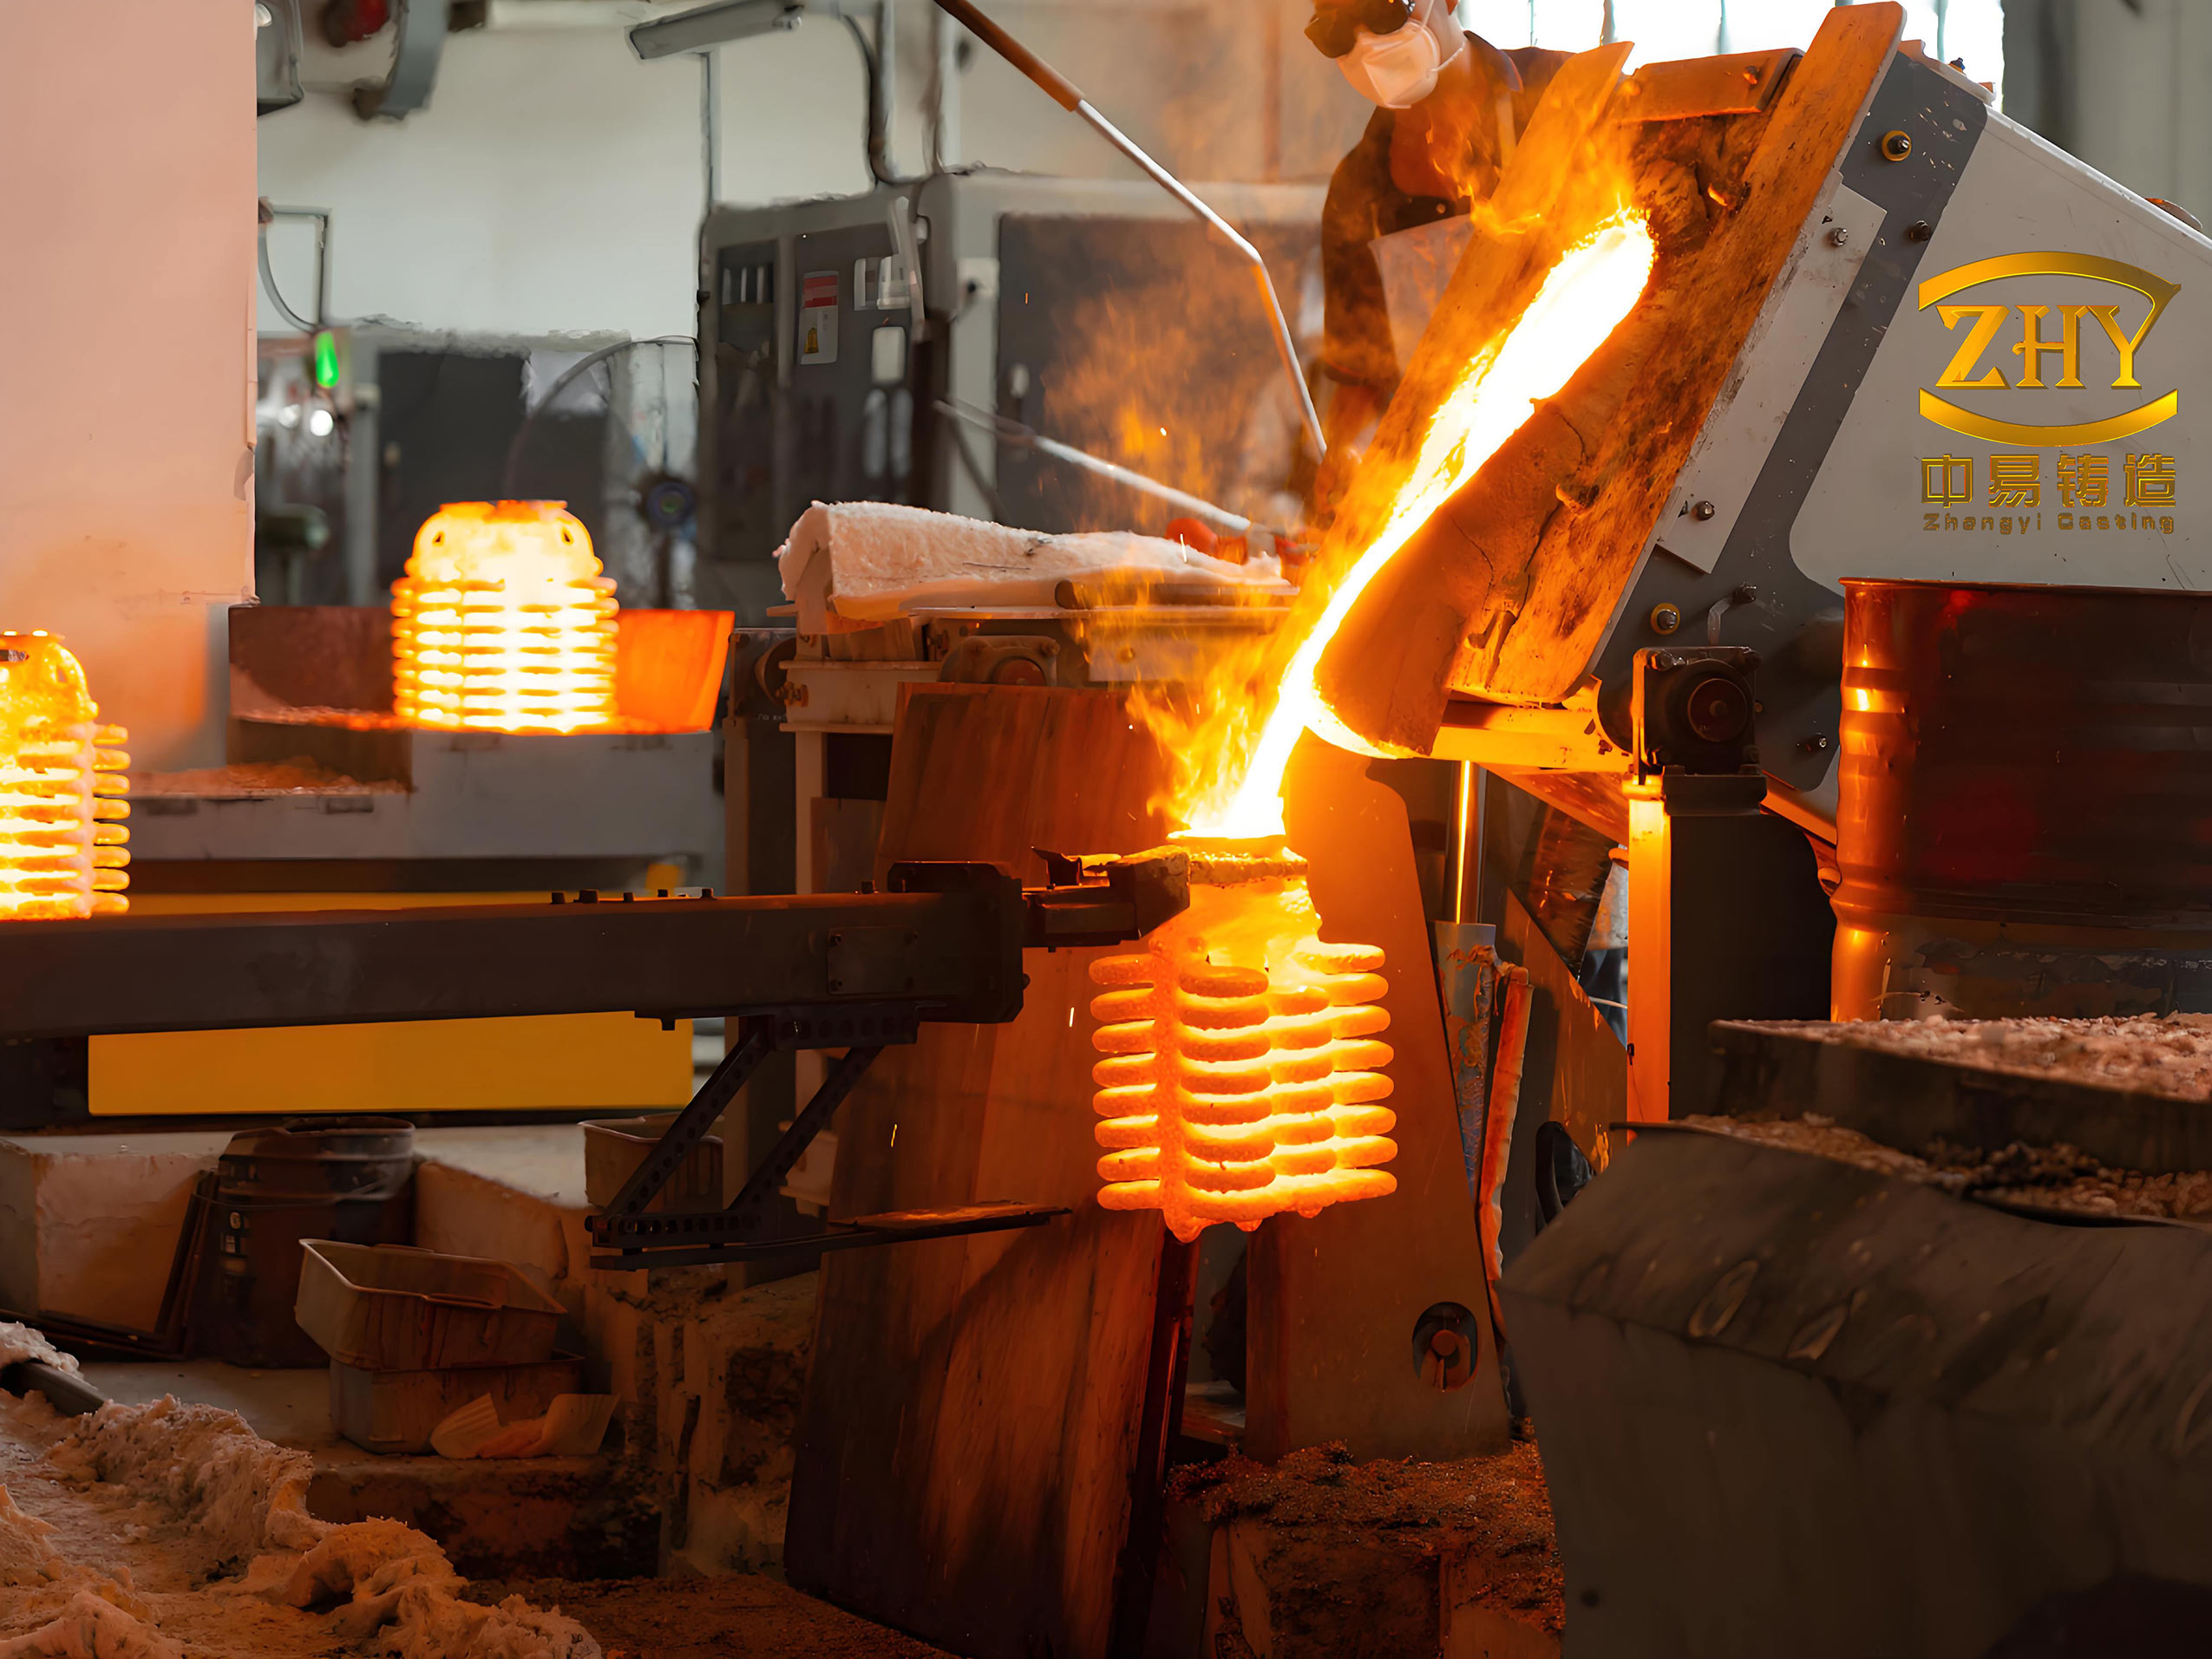
With the simulation-validated design, I proceed to the physical precision lost wax casting steps. The 3D-printed and wax-infiltrated patterns are assembled into a cluster using wax welders. The cluster includes the block pattern, gating system, and feeders. This assembly is then subjected to the ceramic shell-building process. I have employed two primary shelling techniques for this application: the conventional silica sol-based ceramic shell process and a gypsum (plaster) mold process. Both are forms of precision lost wax casting, but they cater to different requirements in terms of surface finish, dimensional accuracy, and production scale.
For the silica sol process, the cluster undergoes repeated dipping into a ceramic slurry (typically based on zircon or fused silica) followed by stuccoing with refractory granules. Each layer is dried in a controlled environment to build a shell thickness of 8–10 mm. The shell must exhibit sufficient green strength to withstand wax removal and high-temperature firing. The dewaxing is typically done using an autoclave or steam dewaxing, where high-pressure steam rapidly melts the wax pattern, which drains out. The shell is then fired at temperatures up to 1200°C to remove residual volatiles, sinter the ceramic, and achieve the required permeability and hot strength. The firing cycle must be carefully controlled to avoid thermal shock. A typical firing schedule involves ramping to 250°C to remove any remaining wax traces, holding to ensure complete burnout, then raising to 900–1200°C for sintering. The fired mold is then ready for pouring.
In the gypsum mold process, which is often used for complex, thin-walled parts requiring excellent surface detail, the pattern cluster is placed in a flask, and a gypsum-based slurry is poured under vacuum to ensure complete encapsulation without air bubbles. The mold sets at room temperature over 15–20 hours. Dewaxing here is more challenging because gypsum is moisture-sensitive and cannot withstand steam dewaxing. I employ a burnout oven method, gradually heating the mold from 90°C to 140°C over 1–3 hours to melt and vaporize the wax. This must be done cautiously to avoid mold cracking from rapid gas generation. After dewaxing, the gypsum mold is further fired at around 700–800°C to remove residual organics and develop strength. The lower firing temperature compared to ceramic shells is a constraint but sufficient for aluminum alloys.
Pouring is a critical phase. The molten ZL101A alloy is held at 700°C, and the preheated iron sleeves are placed in the mold cavity prior to closing (for the ceramic shell process) or positioned during pattern assembly. The mold is preheated to 400°C (for ceramic) or 150°C (for gypsum) to ensure proper metal flow and reduce thermal gradients. The pour is completed quickly, within about 12 seconds, to maintain thermal homogeneity. After solidification, the mold is knocked off, and the casting is cut from the runner system. Post-casting operations include heat treatment (T6 solution treatment and aging for ZL101A), machining of critical surfaces, and non-destructive testing to verify integrity.
The resulting bimetallic engine block casting exhibits excellent dimensional conformity to the CAD model, with smooth surface finishes and no evident shrinkage defects in critical areas. The integration of the iron sleeve is achieved metallurgically, providing the required wear resistance in the cylinder bores while leveraging the lightweight aluminum for the block structure. This outcome validates the efficacy of combining 3D printing with precision lost wax casting. The entire process, from digital design to a finished casting, can be compressed to a few weeks, compared to several months for traditional routes. Moreover, the ability to rapidly iterate designs based on testing feedback—by simply modifying the CAD file and re-printing the pattern—significantly de-risks development and accelerates time-to-market.
To quantify the benefits, I have compiled a comparative analysis of key metrics between conventional precision lost wax casting (using tooled wax patterns) and the 3D printing-enhanced precision lost wax casting approach, as practiced in my projects. This is presented in Table 3.
| Metric | Traditional Precision Lost Wax Casting | 3D Printing + Precision Lost Wax Casting |
|---|---|---|
| Pattern Lead Time | 4–8 weeks (for mold design & fabrication) | 1–3 days (direct from CAD) |
| Cost for First Article | High (模具 amortization) | Relatively Low (no tooling) |
| Design Change Flexibility | Low (requires mold modification) | Very High (digital file edit) |
| Risk of Defects from Pattern Inaccuracy | Depends on mold wear & tolerance | Minimal (direct digital accuracy) |
| Typical Surface Roughness (Ra) | 3.2 – 6.3 μm | 3.2 – 6.3 μm (comparable after shell process) |
| Ability to Create Internal Complexities | Limited by core & mold design | Excellent (SLS can produce intricate cores/patterns) |
| Overall Development Cycle (Design to Casting) | 4–5 months | 3–4 weeks |
The table underscores the transformative impact of additive manufacturing on the front-end of precision lost wax casting. While the latter stages (shell building, melting, pouring) remain largely unchanged, the pattern production paradigm shift is revolutionary. This synergy is not without challenges, however. The 3D-printed polystyrene patterns have different thermal expansion characteristics compared to conventional injection-molded wax. During shell building and dewaxing, this can induce stresses if not accounted for. I have found that optimizing the wax infiltration formula and controlling the shell drying rates mitigates this issue. Additionally, the surface finish of the SLS pattern, though improved by wax infiltration, may still require minor manual finishing to achieve the optimal surface for ceramic slurry adhesion. These are small trade-offs for the enormous gains in speed and flexibility.
Looking deeper into the metallurgical aspects, the precision lost wax casting process, when coupled with simulation, ensures sound metallurgy. The solidification rate \( G \) and growth velocity \( R \) at the solid-liquid interface determine the microstructure. For aluminum-silicon alloys, a fine, eutectic structure is desirable for mechanical properties. The cooling rate can be approximated by:
$$ \frac{dT}{dt} \approx \frac{k (T_{\text{melt}} – T_{\text{mold}})}{\rho C_p \cdot L^2} $$
where \( L \) is a characteristic length (e.g., wall thickness). In precision lost wax casting, the ceramic shell provides a relatively high thermal resistance, leading to moderate cooling rates that favor a sound, dense structure without excessive porosity. For the bimetallic interface, the preheat of the iron sleeve ensures that the aluminum alloy solidifies directionally onto it, promoting a diffusive bond rather than a mere mechanical fit. Post-casting heat treatment further enhances the properties through precipitation hardening.
In conclusion, my experience demonstrates that the integration of 3D printing, particularly SLS, with precision lost wax casting is a potent enabler for rapid, high-quality manufacturing of complex components like bimetallic engine blocks. This hybrid approach leverages the digital agility of additive manufacturing for pattern creation and the proven capabilities of precision lost wax casting for metallurgical excellence. It drastically compresses development timelines, reduces upfront costs for prototypes and small batches, and provides unparalleled design freedom. As additive manufacturing materials and processes continue to advance—with developments in direct metal printing of casting cores or even entire molds—the synergy with precision lost wax casting will only deepen. For engineers and foundries facing the pressures of innovation and customization, embracing this integrated methodology is not just advantageous; it is becoming essential to stay competitive. The journey from a digital concept to a physical, functional casting has never been shorter or more controllable, thanks to the marriage of these two powerful technologies.
To further illustrate the technical details, I include a summary of key formulas used in the process design and optimization for precision lost wax casting with 3D-printed patterns. These formulas are integral to achieving predictable outcomes.
Energy Density in SLS: $$ E_d = \frac{P}{v \cdot h \cdot \delta} $$ This governs pattern density and strength.
Heat Conduction during Solidification: $$ \rho C_p \frac{\partial T}{\partial t} = \nabla \cdot (k \nabla T) + \dot{q} $$ The cornerstone of casting simulation for defect prediction.
Feeding Distance Rule of Thumb: $$ L_f \leq C \cdot M $$ Guides riser placement to eliminate shrinkage.
Cooling Rate Approximation: $$ \frac{dT}{dt} \approx \frac{k (T_{\text{melt}} – T_{\text{mold}})}{\rho C_p \cdot L^2} $$ Influences microstructure and mechanical properties.
By applying these principles, I have consistently achieved high-integrity castings through precision lost wax casting, enhanced by the speed and flexibility of 3D printing. This approach is set to redefine how we think about manufacturing complex, high-performance metal components in the era of digital industrialization.