
The manufacture of critical components for aerospace applications, such as turbojet compressor blades, demands manufacturing processes capable of producing complex geometries with high dimensional accuracy and excellent surface finish. Among the various manufacturing techniques, the investment casting process stands out as a premier method for producing such intricate near-net-shape parts. This article delves into a detailed exploration of the investment casting process for a specific turbojet compressor blade, chronicling the journey from digital design and process simulation to physical fabrication and defect analysis. The overarching goal is to elucidate a complete and optimized investment casting process chain, leveraging modern tools like 3D printing and numerical simulation to enhance first-pass success rates and final part quality.
1. Introduction and Process Overview
The investment casting process, also known as lost-wax casting, has been a cornerstone of precision manufacturing for decades. Its fundamental principle involves creating a disposable pattern (traditionally wax), surrounding it with a refractory ceramic shell, melting out the pattern, and then pouring molten metal into the resulting cavity. This technique is exceptionally well-suited for components with complex internal passages, thin walls, and stringent metallurgical requirements, such as turbine and compressor blades. The transition from forged to cast superalloy blades in the mid-20th century marked a pivotal moment, solidifying the role of the investment casting process in modern propulsion systems.
For educational and research purposes, a turbojet compressor blade presents an ideal case study. It encapsulates the core challenges of the investment casting process—managing shrinkage, ensuring complete filling, and minimizing defects—within a geometrically demanding but instructionally accessible component. The process route investigated here utilizes a gypsum-based investment, combined with additive manufacturing for pattern creation and vacuum-assisted casting, representing a streamlined yet technically rigorous application of the investment casting process.
The generalized sequence for this specific gypsum investment casting process is as follows:
1. 3D Printing of Wax Pattern
2. Pattern Assembly and Gating System Attachment
3. Preparation and Vacuum Dewaxing of Gypsum Slurry
4. Gypsum Mold Drying and High-Temperature Burn-out
5. Vacuum Melting and Pouring
6. Knock-out, Cut-off, and Finishing
2. Process Design and Numerical Simulation
Prior to any physical experimentation, a comprehensive process design phase is crucial. This phase involves defining part geometry, selecting appropriate process allowances, and conducting numerical simulations to predict and mitigate potential casting defects. The digital twin of the process serves as a low-risk, high-insight platform for optimization.
2.1 Geometric Modeling and Allowance Determination
The process begins with the creation of a detailed 3D CAD model of the compressor blade. Based on the final part requirements, machining allowances must be added to critical surfaces. For gypsum mold precision casting, the allowances are typically determined by the maximum dimension of the machined surface. For this blade study, the allowances were selected as per the following guideline table.
| Maximum Dimension of Machined Surface (mm) | Machining Allowance (mm) |
|---|---|
| ≤ 100 | 0.8 |
| 100 – 300 | 1.0 |
| 300 – 500 | 1.5 |
For the blade in question, with critical dimensions under 100 mm, an allowance of 0.8 mm was applied. The total linear contraction of the final metal part is a composite result of several factors: pattern material shrinkage, investment expansion/shrinkage during burn-out, and metal solidification shrinkage. The overall linear shrinkage $\epsilon_{total}$ can be conceptually estimated, though precise determination often requires empirical iteration:
$$ \epsilon_{total} \approx \epsilon_{pattern} + \epsilon_{investment} + \epsilon_{metal} $$
Where typical ranges might be: pattern wax shrinkage (0.4-0.6%), investment dehydration shrinkage (0-0.5%), and 304 stainless steel solidification shrinkage (1.1-1.3%), leading to a designed mold enlargement in the range of 1.5-2.0%.
2.2 Numerical Simulation of Filling and Solidification
To virtually validate the gating system design and process parameters, numerical simulation is indispensable. For this study, a commercial casting simulation software was employed. The simulation workflow involved several key steps:
Pre-processing: The 3D CAD assembly, including the blade, runner, and pour cup, was imported and discretized into a finite difference mesh. The material properties for 304 stainless steel and the gypsum investment were assigned from the software’s database. Critical thermal properties include:
– 304 Steel: Liquidus Temperature ($T_L$) = 1454°C, Solidus Temperature ($T_S$) = 1399°C.
– Gypsum Mold: Initial preheat temperature was set to 630°C to replicate post-burn-out conditions before pouring.
| Simulation Parameter | Value / Selection |
|---|---|
| Casting Method | Investment Casting |
| Alloy | 304 Stainless Steel |
| Mold Material | Gypsum |
| Mold Initial Temperature | 630 °C |
| Pouring Temperature | 1490 °C (approx. $T_L$ + 36°C) |
| Filling Time | 10 seconds |
| Gravity | 9.81 m/s² |
Solving & Post-processing: The solver calculated the coupled fluid flow, heat transfer, and solidification phenomena. Key results analyzed were:
1. Filling Sequence: The simulation showed a smooth, progressive fill from the pour cup down the runner and into the blade cavity, with no evident air entrapment or premature freezing in thin sections.
2. Solidification Pattern: The thermal analysis aimed to achieve directional solidification, progressing from the blade tip (farthest from the feeder) back towards the runner and pour cup, which acts as the main feed reservoir. The solidification time $t_s$ at any point can be related to the local thermal conditions described by the Fourier number:
$$ Fo = \frac{\alpha t}{L^2} $$
where $\alpha$ is the thermal diffusivity, $t$ is time, and $L$ is a characteristic length.
3. Defect Prediction: Probabilistic shrinkage porosity models, often based on criteria like the Niyama criterion ($G/\sqrt{\dot{T}}$), were used to identify regions at risk of microporosity. The Niyama criterion $N_i$ is calculated as:
$$ N_i = \frac{G}{\sqrt{\dot{T}}} $$
where $G$ is the temperature gradient and $\dot{T}$ is the cooling rate. Regions with $N_i$ values below a critical threshold are flagged as potential shrinkage sites. The simulation indicated a low probability of major shrinkage defects in the blade body, validating the initial gating design for this specific investment casting process.
3. Implementation of the Gypsum Investment Casting Process
With a simulation-validated design, the physical implementation of the investment casting process commenced. This section details the materials, equipment, and precise parameters used at each stage.
3.1 Pattern Production via Additive Manufacturing
Traditional wax injection molding for patterns requires hard tooling. For prototyping and low-volume production, additive manufacturing offers a flexible alternative. A ProJet 2500 series 3D printer, utilizing MultiJet Printing (MJP) technology, was employed. This printer uses a UV-curable acrylic-based photopolymer to build the pattern layer by layer (layer thickness = 32 µm), with a wax-like support material. The key advantages for the investment casting process are the high resolution (up to 800×900×790 DPI), excellent surface finish, and the ability to directly print the complex blade geometry along with its integrated gating system without any tooling. The support material is removed using a warm water bath.
3.2 Investment Slurry Formulation and Dewaxing
The mold material is critical to the success of the investment casting process. For this study, a gypsum-bonded investment was chosen for its good surface finish and suitability for casting non-ferrous and lower-melting-point ferrous alloys like stainless steel in a research setting.
Investment Composition: The base binder was α-calcium sulfate hemihydrate (α-Plaster of Paris), preferred over the β-form for its higher density and strength. To reduce thermal shrinkage and cracking, and to increase refractoriness, silica flour was added as a filler. A typical mix ratio by weight was:
– α-Hemihydrate Plaster: 40%
– Silica Flour (SiO₂): 60%
– Water: Required for workable slurry (typical water/powder ratio ~ 0.40).
Slurry Preparation and Pouring: The mixing protocol is vital to minimize entrapped air, which leads to mold defects. The sequence was:
1. Measured water was placed in a mixing bowl under a vacuum chamber.
2. The investment powder was gradually sifted into the water while mixing at a low speed to avoid lumping.
3. Once all powder was added, the chamber lid was sealed, and a vacuum of 0.06 MPa was drawn. Mixing continued at 300 rpm for 4 minutes. The vacuum helps remove air bubbles entrained during powder addition.
4. Maintaining the vacuum, the slurry was poured carefully around the pattern assembly, allowing it to rise from the bottom of the flask to gently displace air.
Burn-out Cycle: After the slurry set (approximately 1 hour), the flask was transferred to a burn-out furnace. The cycle serves two purposes: removal of the plastic pattern and thermal preparation of the mold. The optimized thermal cycle was:
| Stage | Target Temperature | Time | Purpose |
|---|---|---|---|
| 1. Dewax / Dry | 100 – 120 °C | 2 hours | Melt out and vaporize pattern material. |
| 2. Heat-up | 120 → 700 °C | ~4 hours | Slow heating to prevent cracking. |
| 3. Soak | 700 °C | 1.5 hours | Complete removal of volatiles, stabilize mold. |
The mold must be poured while still hot to prevent premature freezing of the metal.
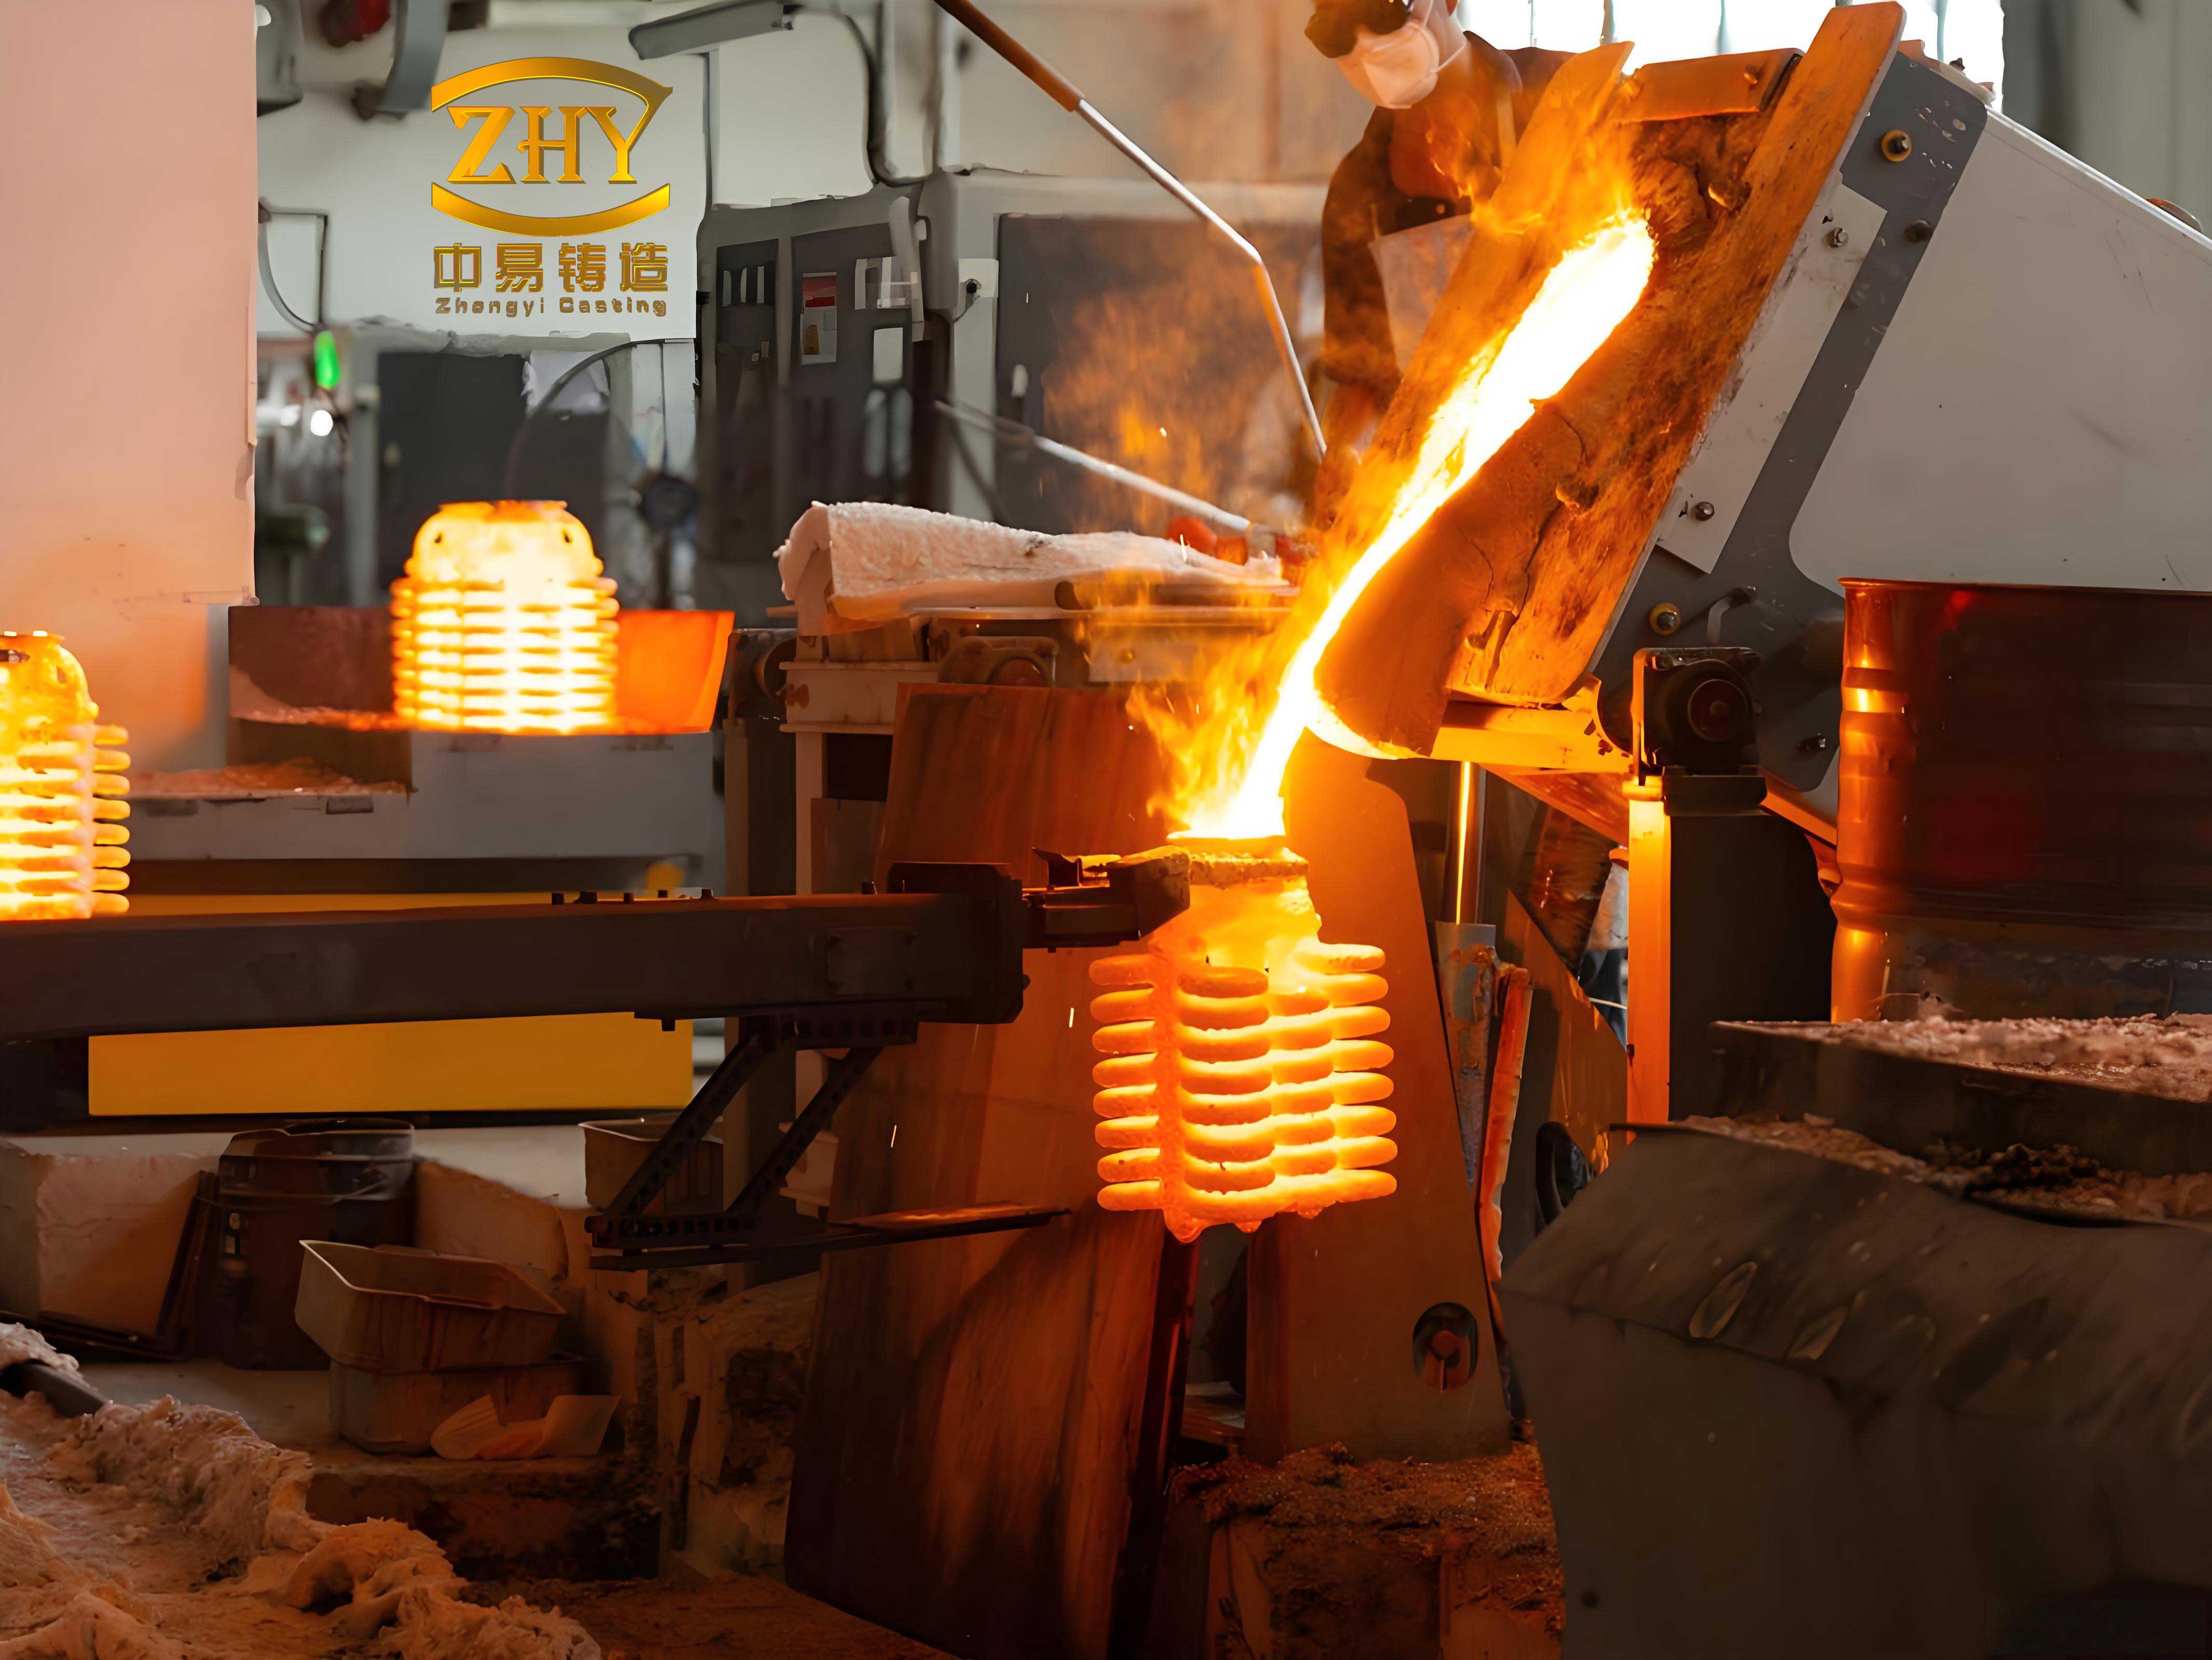
3.3 Melting and Vacuum Pouring
The final metal casting was performed using an MC100V medium-frequency vacuum casting machine. This equipment is ideal for the investment casting process of reactive alloys or when superior metal cleanliness is required.
Process Parameters:
– Alloy: 304 Stainless Steel.
– Crucible: Ceramic crucible rated for ferrous alloys.
– Melting Environment: Vacuum (~10⁻² mbar range). A limited vacuum setting (e.g., -80 kPa) was sometimes used for steels to control violent outgassing.
– Melting Power: Started at 80% of full power (6.4 kW), increased to 100% (8 kW) after vacuum stabilization.
– Pouring Temperature: Aimed for ~1490°C, approximately 36°C above the liquidus.
– Pouring Action: The entire melting chamber is tilted, pouring the molten metal into the stationary, hot gypsum mold placed inside the vacuum chamber. This ensures filling occurs in a vacuum, minimizing oxide formation.
The governing energy input for melting can be simplified as the power required to heat the mass of metal $m$ from room temperature $T_0$ to pouring temperature $T_p$, accounting for the latent heat of fusion $L_f$:
$$ Q = m \left[ c_s (T_m – T_0) + L_f + c_l (T_p – T_m) \right] $$
where $c_s$ and $c_l$ are the specific heats of solid and liquid metal, and $T_m$ is the melting point. The machine’s power supply must deliver this energy within a practical time frame, factoring in system efficiency $\eta$:
$$ P_{required} \approx \frac{Q}{\eta t_{melt}} $$
4. Casting Defect Analysis and Process Optimization
Despite careful simulation and planning, the initial castings revealed some defects. A systematic analysis is a fundamental part of refining the investment casting process.
4.1 Observed Defects and Root Cause Analysis
| Defect Observed | Possible Causes | Scientific Principle / Mechanism |
|---|---|---|
| Surface Spheres/Blobs | 1. Air entrapment in slurry due to insufficient vacuum or incorrect viscosity. 2. Mold wall too thin, causing local hot spots. |
Entrapped air bubbles ($P_{air}$) create cavities. During pouring, molten metal ($P_{metal} > P_{air}$) fills them, forming spherical voids at the surface. Thin sections cool slower, potentially allowing gas to coalesce. |
| Surface Porosity & Incomplete Filling | 1. Incomplete burn-out of pattern residue. 2. Mold or metal temperature too low. 3. Gating system design restricting flow. |
1. Residual hydrocarbon decomposition generates gas pressure $P_{gas}$, opposing metal head pressure $P_{head} = \rho g h$. If $P_{gas} > P_{head}$, metal cannot fill the area. 2. Low temperature increases viscosity $\mu$ and shortens fluidity length $L_f$. The critical Reynolds number for turbulent flow ($Re = \rho v D / \mu$) may not be achieved for complete fill. 3. Inadequate gating ratio causes premature freezing. |
4.2 Corrective Actions and Process Refinement
Based on the analysis, the investment casting process parameters were adjusted:
For Slurry Defects (Spheres):
– Strictly adhered to a 100:40 powder-to-water ratio by weight for consistent viscosity.
– Ensured vacuum during mixing reached and held at 0.06 MPa for the full 4-minute duration.
– Verified the slurry temperature was maintained at 20-22°C before mixing to control setting time.
For Porosity & Incomplete Fills:
– Burn-out Cycle: Increased the high-temperature soak at 700°C to 2 hours to ensure complete removal of any carbonaceous residue. The rate of gas evolution $\dot{V}_{gas}$ must be less than the permeability-limited flow rate out of the mold $\dot{V}_{permeability}$.
– Temperature Control: Increased mold preheat to 650°C and the metal superheat to ~50°C above $T_L$ to improve metal fluidity. The fluidity length is proportional to superheat.
– Gating/Vacuum: Re-checked gating dimensions to ensure a proper pressure gradient. Confirmed the vacuum system was correctly set to manage the outgassing of the molten steel without causing splashing.
Implementing these corrective measures in the investment casting process yielded a significant improvement. Subsequent castings showed complete filling, a dramatic reduction in surface porosity, and the elimination of spherical surface defects. The final as-cast blade required only minimal finishing to meet the dimensional and surface specifications, validating the optimized process.
5. Conclusion
This comprehensive investigation successfully demonstrated the application of the precision investment casting process for manufacturing a turbojet compressor blade. The study underscored the critical importance of integrating digital tools—3D CAD, additive manufacturing for rapid patterning, and advanced numerical simulation—into the traditional investment casting process workflow. Simulation served as a powerful predictive tool for optimizing gating design and solidification, reducing the need for costly physical trial-and-error. The hands-on process implementation highlighted the sensitivity of casting quality to precise control of parameters at every stage: pattern quality, slurry preparation and dewaxing, thermal burn-out cycle, and vacuum pouring conditions. Through systematic defect analysis and scientific reasoning, an optimized set of process parameters was identified, resulting in the production of a sound, high-integrity casting. This end-to-end exploration not only provides a validated technical pathway for producing such complex components but also reinforces the investment casting process as a versatile and controllable method for precision metal forming, adaptable to both industrial production and advanced research/educational applications.