Abstract: The detection of embedded defects in steel castings of butterfly valves using ultrasonic testing technology. During the development of the testing process, the unique acoustic characteristics of steel castings were considered. Suitable parameters for single/double crystal longitudinal wave straight probes were selected through comparative experiments, and the key points of the testing process for both single-crystal and double-crystal straight probes were elaborated. Based on testing experience, the waveform characteristics and mechanisms of four typical clustered internal defects commonly found in large butterfly valve steel castings were summarized. Practice has proven that the composite testing process using single/double crystal longitudinal wave straight probes, as a practical non-destructive testing technology, can ensure that butterfly valve steel castings entering the finishing process meet the corresponding quality requirements.
Keywords: butterfly valve steel casting; ultrasonic testing; straight probe; defect waveform
1. Introduction
Large steel castings have more types and quantities of internal defects compared to small castings due to their larger size, complex production processes, and differences in production equipment and conditions among different enterprises. Defects such as pores, cracks, laminations, and inclusions generated during the casting process of steel castings [1] can not only affect product quality but also potentially lead to a decrease in mechanical and physical properties during equipment operation, causing equipment failure and even compromising safety production.
Currently, the technical requirements for the valve body and butterfly plate in the manufacturing process of large butterfly valves mainly include surface macro inspection (VT), mechanical performance indicators, material chemical composition, heat treatment requirements, and MT, PT, UT testing reports. Ultrasonic testing technology is primarily used to detect buried defects in the machined surfaces of butterfly valve steel castings (including flanges, inner chambers, butterfly plates, etc.) [2-3]. Especially before the finishing process of butterfly valve castings, suitable and strict ultrasonic testing processes should be employed to detect and identify defects, followed by repair and re-inspection, ensuring that they enter the finishing process in a qualified state. Steel castings for hydropower butterfly valves have similar acoustic characteristics to steel parts, with internal structural features such as coarse grains and non-dense structures due to the long solidification and cooling time of local molten steel and slower cooling rates [4-5]. The severe attenuation and scattering of ultrasonic waves due to coarse grains in steel castings is an unavoidable issue in the development of flaw detection processes [6-7]. Additionally, the detection requirements for near-surface defects on machined surfaces make it often impossible to detect such defects using only single-crystal straight probes [8]. Therefore, these issues should be fully considered when developing the testing process, and necessary actual measurements and comparisons should be conducted to select probes (material, type, frequency) and testing methods with appropriate parameters to achieve relatively ideal testing results.
2. Ultrasonic Testing Process for Steel Castings of Butterfly Valves
2.1 Testing Equipment
In this paper, the HS-II digital ultrasonic flaw detector was used, with a vertical linearity error not exceeding 3%, a horizontal linearity error not exceeding 0.1%, a signal bandwidth of 0.5 to 30 MHz, and a gain range of 0 to 120 dB.
Table 1: Parameters of Single-Crystal Straight Probes for Steel Castings of Butterfly Valves
| Steel Casting Thickness (mm) | Nominal Frequency of Single-Crystal Longitudinal Wave Straight Probe (MHz) | Diameter of Circular Crystal Plate (mm) |
|---|---|---|
| 50-100 | 3.0-3.5 | ϕ20-ϕ30 |
| 100-200 | 2.5-3.0 | ϕ20-ϕ30 |
| 200-400 | 2.0-2.5 | ϕ20-ϕ30 |
| 400-600 | 1.5 | ϕ20-ϕ30 |
2.2 Selection of Single-Crystal Longitudinal Wave Straight Probe Parameters
The attenuation of sound energy during ultrasonic flaw detection of steel castings mainly originates from interface reflection and sound wave absorption caused by coarse grains. The higher the probe frequency, the more severe the ultrasonic attenuation [9]. Meanwhile, the interference of grass-like noise formed by irregular reflections at grain boundaries during flaw detection also affects the signal-to-noise ratio of ultrasonic testing. Therefore, lower-frequency probes are preferable for ultrasonic testing of steel castings.
In practical inspection, the accuracy and quality of ultrasonic testing of steel castings are comprehensively affected by multiple factors, and the best testing process effect should be verified through actual field testing. During process debugging, acoustic parameters such as sound velocity, acoustic impedance, and material attenuation coefficients are usually measured to facilitate the selection of appropriate probe parameters (frequency, crystal size), etc. In this project, single-crystal straight probes of different frequencies were used for comparative testing on simulated test blocks within different thickness ranges. Through calculations of attenuation coefficients, comparisons of equivalent flat-bottomed hole defects, and comparisons of signal-to-noise differences during testing, combined with testing equipment conditions, the parameter selection range for single-crystal straight probes for ultrasonic testing of butterfly valve steel castings was established, as shown in Table 1.
2.3 Selection of Double-Crystal Straight Probes
Double-crystal straight probes were used for the detection of buried defects in the near-surface and thin-walled areas of the butterfly valve steel casting. Double-crystal straight probes overcome the limitations of single-crystal straight probes in detecting near-surface defects and can improve the detection sensitivity and accuracy of buried defects. The selection of double-crystal straight probe parameters was based on the actual thickness and defect characteristics of the steel casting, ensuring optimal detection results.
(Insert image: Schematic diagram of double-crystal straight probe)
Figure 1: Schematic Diagram of Double-Crystal Straight Probe
In this schematic diagram, the double-crystal straight probe consists of two crystals, with the transmitting crystal emitting ultrasonic waves and the receiving crystal receiving reflected waves from defects. This design enhances the detection sensitivity for near-surface defects.
3. Detection of Typical Internal Defects in Steel Castings of Butterfly Valves
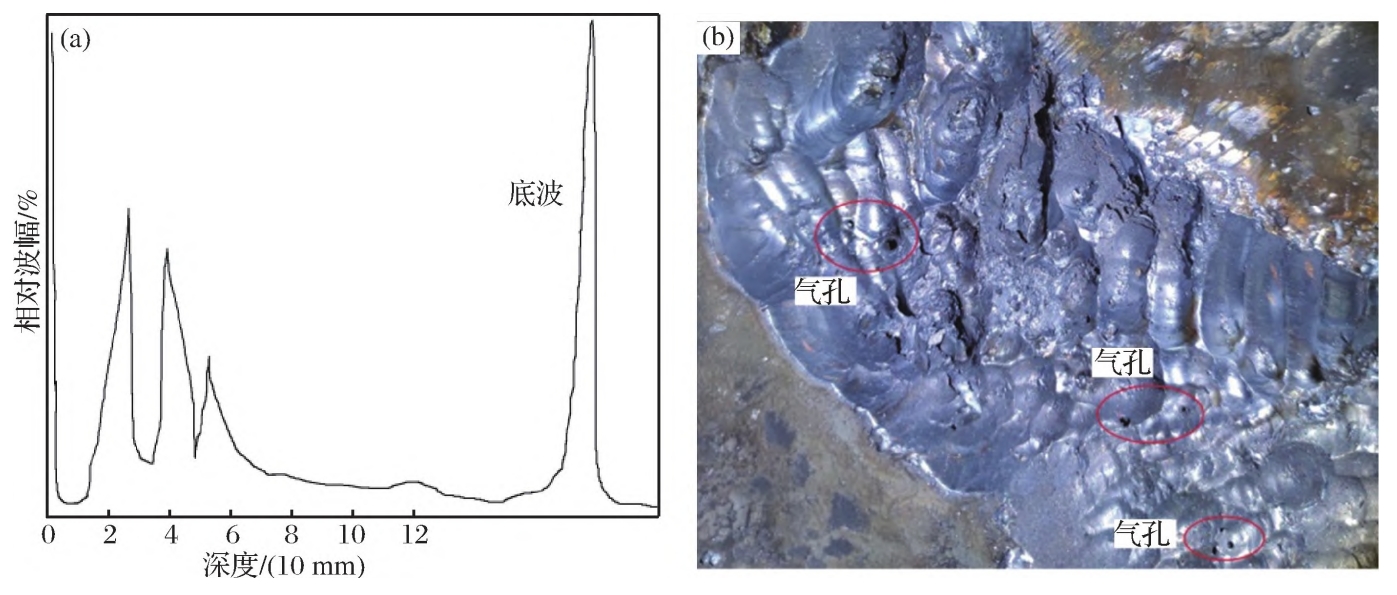
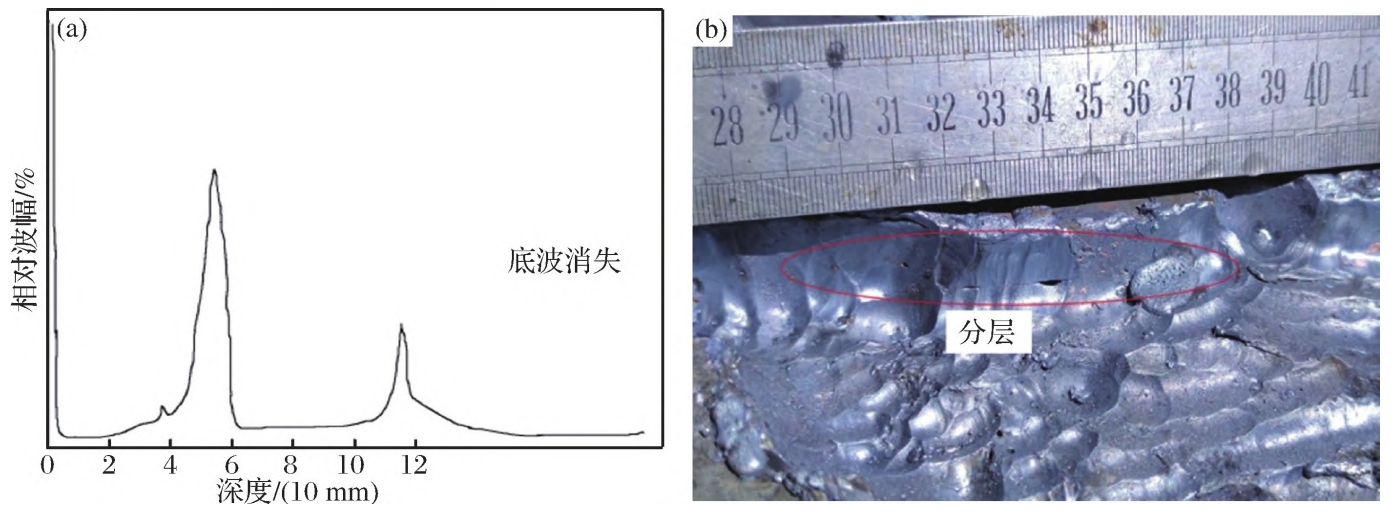
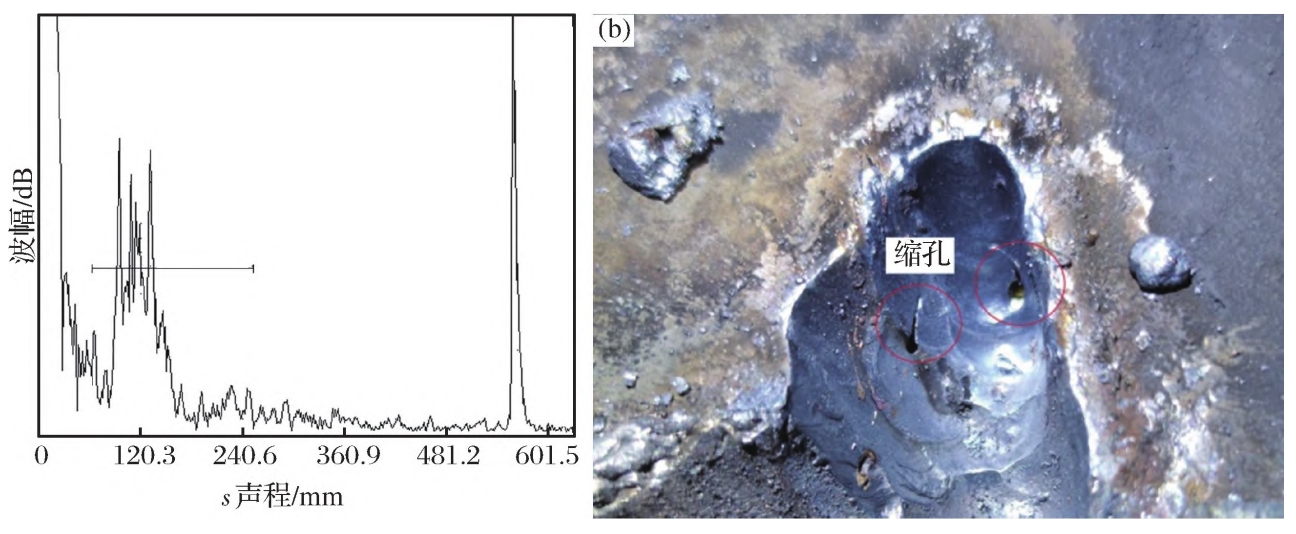
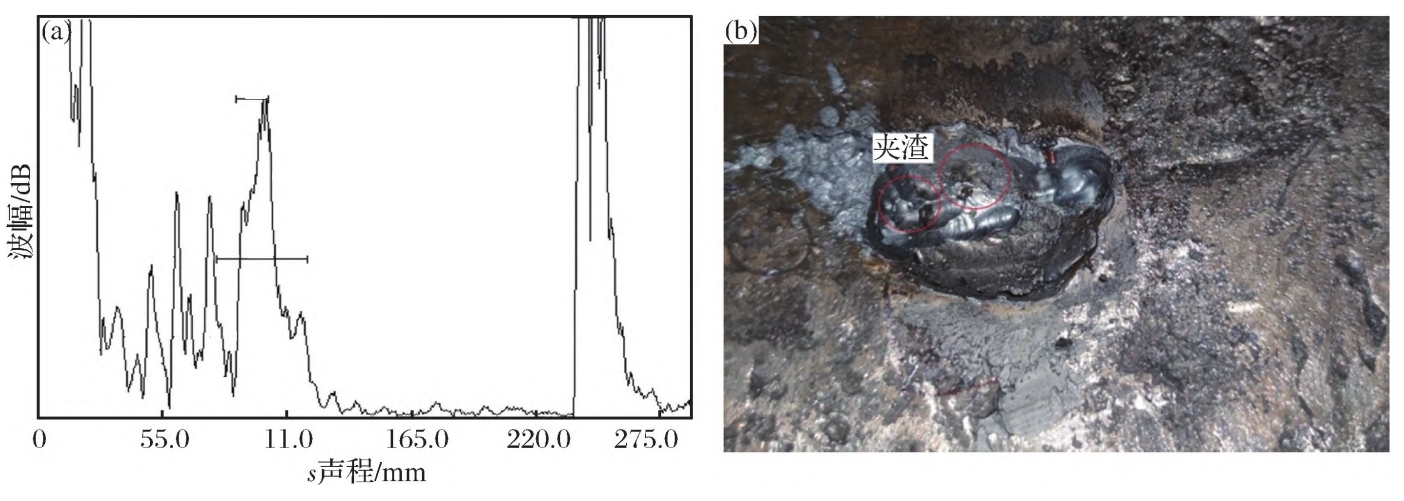
Based on practical testing experience, four typical clustered internal defects commonly found in large butterfly valve steel castings were summarized, including pores, cracks, laminations, and inclusions. Each type of defect has unique waveform characteristics and formation mechanisms.
3.1 Pores
Pores are commonly caused by gas entrapment during the casting process, resulting in small, round, or irregularly shaped cavities in the casting. The waveform characteristics of pores are usually manifested as smooth, bottomless echoes with a certain depth, and the echo amplitude may vary depending on the size and depth of the pores.

3.2 Cracks
Cracks are formed due to stress concentration or shrinkage during the casting process, often presenting as linear defects. The waveform characteristics of cracks are characterized by jagged, sharp echoes with a certain length and depth, and the echo amplitude may increase with crack depth.

3.3 Laminations
Laminations are caused by incomplete fusion between metal layers during the casting process, forming layered structures. The waveform characteristics of laminations are usually manifested as a series of parallel echoes with a certain spacing, and the echo amplitude may vary depending on the thickness and depth of the laminations.

3.4 Inclusions
Inclusions are non-metallic or metallic impurities embedded in the casting, often caused by impurities in the molten steel or casting sand. The waveform characteristics of inclusions are typically manifested as isolated echoes with irregular shapes and varying amplitudes, depending on the size, shape, and composition of the inclusions.

Table 2: Waveform Characteristics and Mechanisms of Typical Internal Defects in Steel Castings of Butterfly Valves
| Defect Type | Waveform Characteristics | Mechanism |
|---|---|---|
| Pores | Smooth, bottomless echoes with a certain depth; varying echo amplitude | Gas entrapment during casting |
| Cracks | Jagged, sharp echoes with a certain length and depth; increasing echo amplitude with crack depth | Stress concentration or shrinkage during casting |
| Laminations | Series of parallel echoes with a certain spacing; varying echo amplitude | Incomplete fusion between metal layers during casting |
| Inclusions | Isolated echoes with irregular shapes and varying amplitudes | Impurities in molten steel or casting sand |
4. Conclusion
In summary, ultrasonic testing technology can effectively detect embedded defects in steel castings of butterfly valves. By selecting appropriate single/double crystal longitudinal wave straight probes and formulating targeted testing processes, the internal quality of steel castings can be accurately evaluated. The composite testing process using single/double crystal longitudinal wave straight probes, as a practical non-destructive testing technology, ensures that butterfly valve steel castings entering the finishing process meet the corresponding quality requirements, improving product reliability and safety.
