
In my extensive experience with precision metal forming, investment casting stands out for its unparalleled ability to produce components with complex geometries, excellent surface finish, and tight dimensional tolerances. This report details my first-hand investigation and process optimization for manufacturing a specific stainless steel exhaust elbow, a critical component in engine systems. The part, characterized by thin-walled (3mm), hollow, and spatially angled passages, presented significant challenges in pattern creation, shell integrity, and metallurgical quality assurance. The successful production required a holistic approach, scrutinizing every step from pattern formation to final heat treatment. The core objective was to develop a robust investment casting process that guarantees structural soundness, dimensional accuracy, and the required material properties for high-temperature service.
The component demanded a material capable of withstanding corrosive exhaust environments and temperatures around 500°C, coupled with good weldability for assembly. Austenitic stainless steel AISI 304 (0Cr18Ni9) was selected. Its face-centered cubic (FCC) structure provides good toughness, elongation, and corrosion resistance. The key metallurgical challenge in investment casting such alloys is preserving the single-phase austenitic structure and preventing sensitization—the precipitation of chromium carbides at grain boundaries—which drastically reduces corrosion resistance. The final mechanical and corrosion properties are highly dependent on the controlled execution of the casting and subsequent solution treatment.
The fundamental advantage of the investment casting process for this part lies in its use of a sacrificial wax pattern. This allows for the formation of the intricate internal cavities without the need for complex core assembly or parting lines typical in other casting methods. The process chain can be summarized by a critical equation governing the filling of thin sections during mold filling, which is paramount for our 3mm wall thickness. The pressure head required to fill a thin section against surface tension and viscous forces can be approximated by modifying the Bernoulli equation with a term for capillary pressure:
$$ P_{required} = \rho g h + \frac{2\gamma \cos\theta}{r} + \frac{8 \mu L Q}{\pi r^4} $$
Where $P_{required}$ is the required pressure at the gate, $\rho$ is the molten metal density, $g$ is gravity, $h$ is the effective metal head height, $\gamma$ is the surface tension, $\theta$ is the contact angle, $r$ is the hydraulic radius of the thin section, $\mu$ is the dynamic viscosity, $L$ is the flow length in the thin section, and $Q$ is the volumetric flow rate. For a successful fill in investment casting, the available pressure from the gating system must exceed $P_{required}$.
1. Pattern Formation: The Foundation of Precision
The creation of an accurate wax pattern for the hollow elbow was the first major hurdle. Three distinct methodologies were explored and evaluated, each with its own trade-offs in terms of cost, complexity, dimensional accuracy, and environmental impact.
1.1 Soluble Core Technique (Urea Core)
Initially, a traditional soluble core method was employed. A master core die was used to produce a solid urea core that precisely defined the internal passage. The wax was then injected around this core. The key steps and considerations were:
- Core Production: Molten urea, often modified with additives like sucrose (approx. 1-2 wt%) to increase viscosity and reduce gas entrapment, was poured into the core die. The viscosity $\eta_{mix}$ can be empirically related to the additive concentration $C$ by: $\eta_{mix} \approx \eta_{urea} (1 + kC)^n$, where $k$ and $n$ are constants.
- Pattern Injection: The cured urea core was placed into the wax injection die, and standard injection parameters were used.
- Core Removal: After injection, the assembly was immersed in warm water (40-50°C) to slowly dissolve the urea core. Rapid cooling in cold water was avoided initially to prevent thermal stress cracking of the wax; the wax modulus $E_wax(T)$ decreases significantly above its softening point. The core dissolution rate $R_d$ follows an approximate relationship: $R_d \propto D (C_{sat} – C_{bulk}) / \delta$, where $D$ is the diffusion coefficient, $C_{sat}$ is the urea solubility concentration, $C_{bulk}$ is the concentration in the bulk water, and $\delta$ is the boundary layer thickness.
While cost-effective, this method introduced process steps (core making, handling, dissolution) and potential for surface defects on the wax pattern from core imperfections.
1.2 Wax Assembly Technique
To streamline the process and eliminate the soluble core, a method involving the assembly of two wax halves was developed. The pattern die was designed to produce two symmetric halves featuring interlocking features (tongue-and-groove).
- Dual Injection: Two wax halves were injected separately.
- Precision Assembly: The halves were aligned using the interlocking features. A low-viscosity adhesive wax was applied to the joint interface. The strength of the bonded joint $\sigma_{bond}$ is critical and depends on the interdiffusion of polymer chains: $\sigma_{bond} \propto \sqrt{t \cdot \exp(-E_a/RT)}$, where $t$ is contact time, $E_a$ is activation energy for diffusion, $R$ is the gas constant, and $T$ is the bonding temperature.
- Sealing: The seam was meticulously sealed using a hot wax welder to ensure no leakage during shell building.
This method improved production rate and reduced consumable cost but demanded high skill in assembly and sealing to prevent mismatch or bleed-out defects in the final casting.
1.3 Complex Collapsible Core Technique
For maximum precision and repeatability, a die with a multi-piece collapsible metal core was designed. This is the most advanced and capital-intensive approach for investment casting of such internal geometries.
- Core Design: The internal cavity was segmented into multiple collapsible steel core pieces. The minimum number of pieces $N_{min}$ is determined by geometric undercut analysis: $N_{min} = \lceil \theta_{undercut} / \theta_{draw} \rceil + 1$, where $\theta_{undercut}$ is the total angle of undercut and $\theta_{draw}$ is the achievable draw angle per piece.
- Injection & Extraction: After wax injection and solidification, the core pieces were sequentially withdrawn in a specific order to allow the wax pattern to be released without distortion.
The comparison of these three primary pattern-making techniques for this investment casting application is summarized below:
| Technique | Relative Tooling Cost | Pattern Accuracy | Production Rate | Key Challenge | Best For |
|---|---|---|---|---|---|
| Soluble Urea Core | Low | Medium (Core Defects) | Slow | Core Handling & Dissolution | Prototypes, Low Volume |
| Wax Assembly | Medium | High (Skill Dependent) | Medium-Fast | Bond Integrity & Sealing | Medium Volume |
| Collapsible Metal Core | Very High | Very High | Very Fast | Complex Die Design/Maintenance | High Volume Production |
2. Shell Engineering: Building the Refractory Mold
The ceramic shell is the negative of the final part and must withstand the thermal and mechanical shock of molten steel (~1550°C) while providing a smooth surface finish. For high-integrity stainless steel investment casting, a colloidal silica (silica sol) bonded system was exclusively used due to its environmental and quality benefits over ethyl silicate or water glass.
The shell is built up in distinct functional layers, each with a specific purpose. The total shell thickness $t_{shell}$ is a summation: $t_{shell} = t_{facecoat} + \sum_{i=1}^{n} t_{backup,i}$. A typical sequence for this part involved 1 facecoat, 1-2 transition coats, and 3-4 backup coats, followed by a seal coat.
The composition and function of each layer are critical. The following table details the standard build-up for this AISI 304 investment casting:
| Layer Number & Name | Primary Binder | Refractory Flour | Stucco Sand (Mesh) | Primary Function | Key Parameter |
|---|---|---|---|---|---|
| 1: Facecoat | Colloidal Silica | Zircon (ZrSiO₄) | Zircon (70/100) | Provide smooth surface; initial reaction barrier. | Viscosity: 20-22 sec (Ford Cup #4) |
| 2-3: Transition Coats | Colloidal Silica | Alumina-Silica Blend | Alumina-Silica (50/80) | Bind facecoat to backup; prevent delamination. | Viscosity: 18-20 sec |
| 4-6: Backup Coats | Colloidal Silica | Fused Silica (SiO₂) | Fused Silica (30/50, 16/30) | Provide structural strength, permeability, and insulation. | Slurry Density: 1.75-1.85 g/cm³ |
| 7: Seal Coat | Colloidal Silica | Fused Silica | None | Consolidate outer surface; trap loose stucco. | – |
The drying kinetics between each dip are governed by the diffusion of water through the gelling binder. The drying time $t_d$ for a layer of thickness $L$ can be estimated from Fick’s second law: $\frac{\partial C}{\partial t} = D_{eff} \frac{\partial^2 C}{\partial x^2}$, where $C$ is the moisture concentration and $D_{eff}$ is the effective diffusivity, which is highly dependent on ambient temperature $T$ and humidity $RH$: $D_{eff} \propto \exp(-E_d/RT) \cdot (1 – RH)$. Controlled drying at 22-25°C and 40-50% RH was essential to prevent cracking or distortion.
3. De-waxing and Firing: Creating the Ceramic Mold
Once the shell build is complete, the wax must be removed to create the cavity. This was done using an autoclave with high-pressure steam. The rapid heating melts the wax and generates internal pressure that fractures the wax body and pushes it out of the sprue. The heat transfer during this phase is crucial. The approximate time $t_{melt}$ for the wax core to reach its melt temperature is given by the lumped capacitance method (valid for thin shells):
$$ t_{melt} \approx \frac{\rho_{wax} c_{p,wax} V}{h A} \ln \left( \frac{T_{steam} – T_{initial}}{T_{steam} – T_{melt}} \right) $$
Where $h$ is the convective heat transfer coefficient of steam, $A$ and $V$ are the pattern’s surface area and volume, and $T_{steam}$, $T_{initial}$, $T_{melt}$ are steam, initial, and wax melt temperatures respectively.
Following de-waxing, the shell is fired to between 1000°C and 1150°C for several hours. This process serves multiple vital functions in the investment casting process:
- Burn-out of Residual Organics: Complete combustion of any leftover wax or binder.
- Sintering and Strength Development: The ceramic particles bond, increasing the shell’s hot strength and modulus. The sintering shrinkage $\Delta L/L_0$ can be modeled for initial stage sintering by: $\Delta L/L_0 \propto \left( \frac{\gamma \Omega D}{k_B T a^3} \cdot t \right)^{1/n}$, where $\gamma$ is surface energy, $\Omega$ is atomic volume, $D$ is diffusivity, $a$ is particle radius, and $n$ is an exponent (~3 for volume diffusion).
- Thermal Stabilization: The shell reaches a uniform high temperature, minimizing thermal shock when molten metal is poured and allowing for “hot mold” casting, which is critical for filling thin sections. The preheat temperature directly influences the fluidity length of the metal.
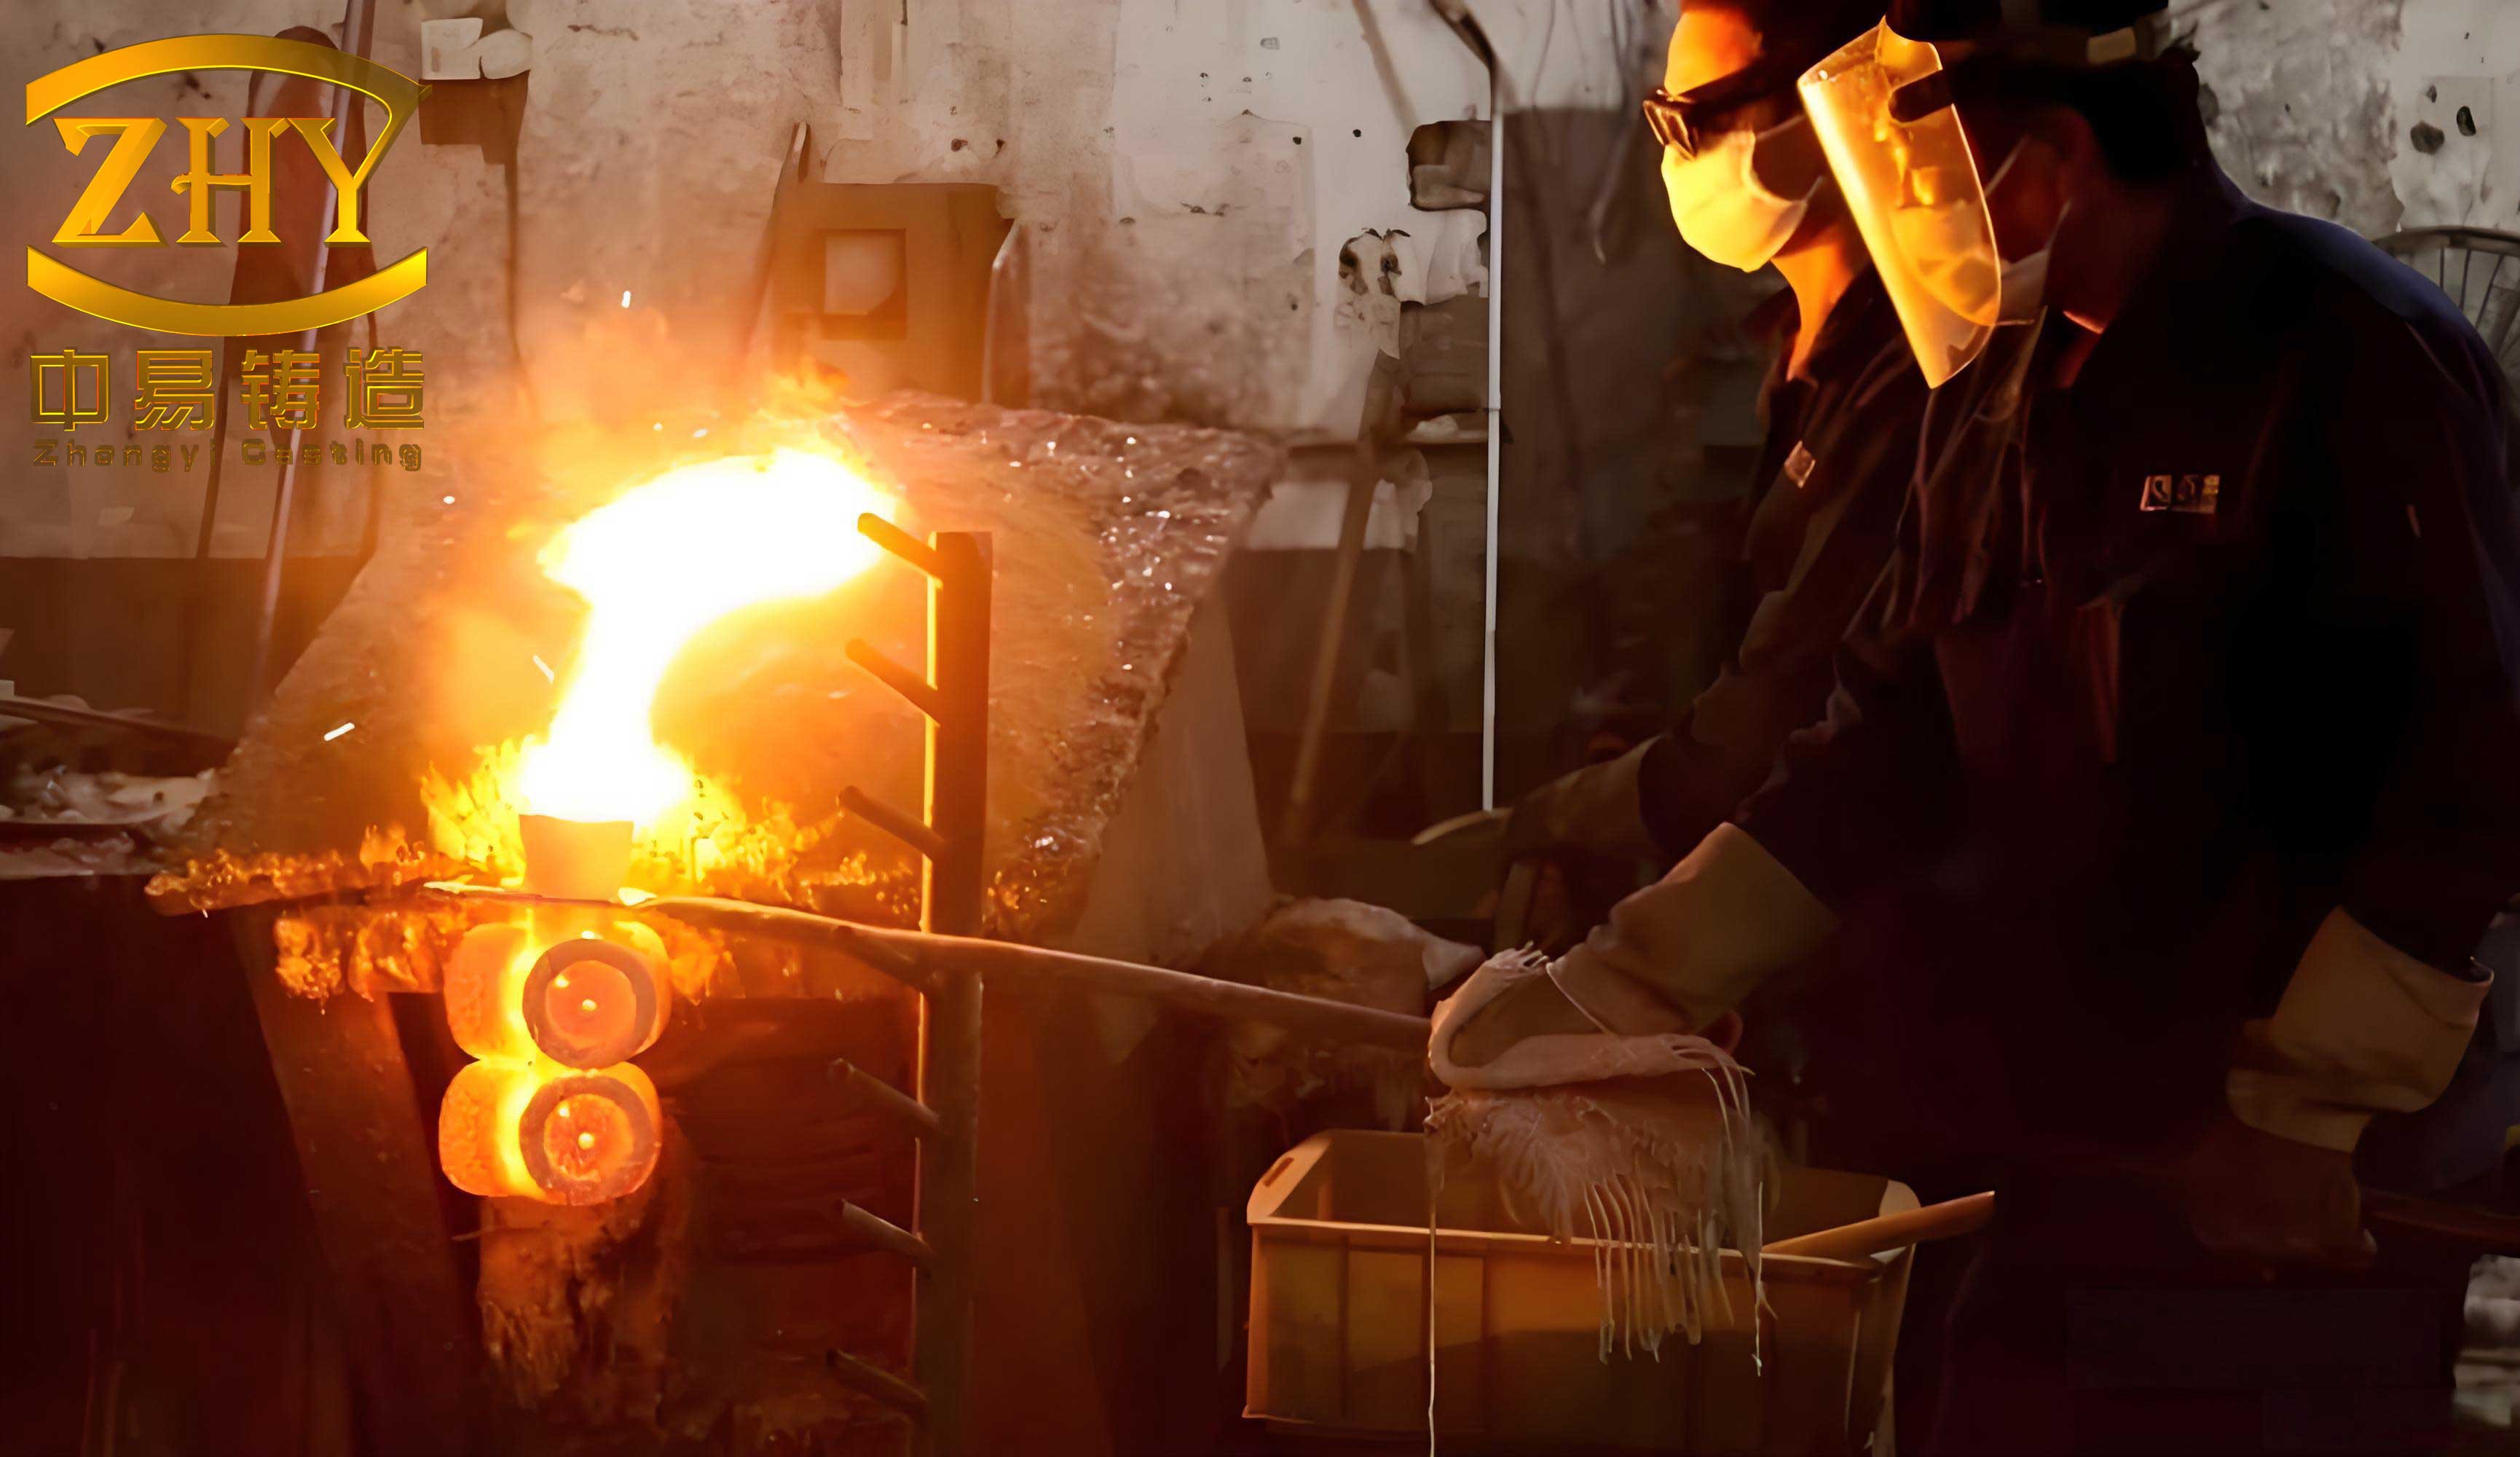
4. Melting, Pouring, and Solidification
The melting of AISI 304 stainless steel for investment casting requires careful control to achieve the target chemistry and minimize inclusions. A medium-frequency induction furnace lined with a neutral (e.g., alumina-based) refractory was used to prevent unwanted reactions that could introduce oxides or slag. The aim chemistry is shown below:
| Element | C | Si | Mn | P | S | Cr | Ni | Fe |
|---|---|---|---|---|---|---|---|---|
| Target (wt.%) | ≤ 0.08 | ≤ 1.00 | ≤ 2.00 | ≤ 0.045 | ≤ 0.030 | 18.0-20.0 | 8.0-11.0 | Balance |
The gating system was designed as a top-pouring cluster of four parts to leverage gravitational head pressure for filling and to concentrate potential shrinkage and oxides in the feeder heads. The key temperatures were tightly controlled:
- Superheat Temperature (Tsuperheat): 1730-1750°C. This provides the necessary thermal energy for flow.
- Pouring Temperature (Tpour): 1650-1680°C. The actual temperature of the metal entering the mold must be high enough to prevent mistuns but low enough to minimize metal-mold reaction and gross shrinkage.
The temperature drop $\Delta T$ from furnace to mold is critical: $\Delta T = T_{superheat} – T_{pour}$. It accounts for losses during tapping and transfer. The filling time $t_{fill}$ for a thin-section mold can be estimated using the equation for $P_{required}$ mentioned earlier, solved for flow rate $Q$ and integrated over the cavity volume $V$: $t_{fill} \approx V / Q(P_{available}, r, \mu, …)$.
Solidification in thin sections is rapid and primarily directional, following the heat extraction through the ceramic shell. The local solidification time $t_f$ at a point is governed by Chvorinov’s Rule: $t_f = B \cdot (V/A)^n$, where $B$ is the mold constant and $n$ is often close to 2. For our 3mm wall, the (Volume/Area) ratio is small, leading to fast freezing and a fine-grained microstructure, which benefits mechanical properties.
5. Post-Casting Operations: Cleaning and Finishing
After shakeout to remove the bulk of the shell, the castings require careful finishing. Due to the softness and corrosion-sensitive nature of austenitic stainless steel, specific methods are mandatory in investment casting:
- Cut-off: The gates and feeders were removed using abrasive cut-off wheels or plasma arc cutting to avoid mechanical tearing.
- Grinding & Blasting: Residual gate stubs were ground flush. For descaling and surface cleaning, blasting with austenitic stainless steel shot (typically 430-grade) is essential. Using carbon steel shot would embed ferrous particles, causing rust stains and potential initiation sites for corrosion. The shot peening also induces a beneficial compressive surface stress $\sigma_{surf}$.
- Weld Repair: Minor surface discontinuities were repaired using TIG welding with an ER308LSi filler wire, ensuring matching corrosion resistance. The weld thermal cycle must be controlled to stay below the sensitization temperature range (approx. 450-850°C) for the parent metal.
6. Solution Treatment: Restoring the Austenitic Structure
The final and critical step for achieving the specified material properties is solution heat treatment, or solution annealing. During casting and cooling, some precipitation of chromium carbides (M23C6) can occur at grain boundaries, especially if the cooling rate through the critical range is too slow. This depletes chromium in adjacent regions, leading to sensitization.
The solution treatment involves heating the castings to a temperature where all carbides are dissolved back into the austenite matrix, followed by rapid quenching to retain a homogeneous single-phase structure. For AISI 304, the standard treatment is:
- Temperature: 1065 ± 15°C. This is high in the single-phase austenite field, as per the Fe-Cr-Ni-C phase diagram.
- Time: 1.5 to 2 hours. The time $t_{sol}$ must be sufficient for complete dissolution of carbides. The dissolution kinetics can be described by a parabolic rate law for spherical particles: $r_0^2 – r(t)^2 = K_p \cdot t$, where $r_0$ is initial particle radius, $r(t)$ is radius at time $t$, and $K_p$ is the rate constant strongly dependent on temperature: $K_p \propto \exp(-Q_{diff}/RT)$.
- Quenching: Rapid cooling in water or polymer quenchant. The goal is to bypass the carbide precipitation nose on the Continuous Cooling Transformation (CCT) diagram. The critical cooling rate $CR_{crit}$ must be exceeded: $CR_{actual} > CR_{crit}$. $CR_{actual}$ is enhanced by agitation of the quenchant.
The effectiveness of the solution treatment can be qualitatively assessed by the degree of carbide dissolution and the resulting corrosion resistance, often tested via methods like the ASTM A262 Practice E (Strauss test) or electrochemical potentiokinetic reactivation (EPR) tests.
7. Conclusion and Integrated Process Perspective
The successful investment casting of the complex stainless steel exhaust elbow is a testament to the synergy of multiple disciplined processes. From the initial choice of pattern technique—whether soluble core, wax assembly, or collapsible core—through the meticulous engineering of the multi-layer ceramic shell, to the precise control of metallurgical variables during melting and heat treatment, each step is interlinked. The process parameters are not independent; they form a complex system. For instance, the shell preheat temperature ($T_{shell}$) directly affects the required superheat ($\Delta T_{super}$) to achieve the target pouring temperature ($T_{pour}$), which in turn influences grain size ($d \propto (G \cdot R)^{-1/2}$, where $G$ is thermal gradient and $R$ is growth rate) and solidification shrinkage feeding requirements.
Key learnings from this comprehensive investment casting project include:
- The pattern-making method is a primary driver of cost, quality, and volume capability, and must be selected based on a holistic production strategy.
- Shell system design (materials, layer sequence, drying) is foundational for achieving both surface quality and dimensional stability in thin-section castings.
- For austenitic stainless steels, the entire process chain—from using neutral furnace linings to controlled solution treatment—must be designed to preserve corrosion resistance by preventing contamination and sensitization.
- Process optimization in investment casting is an iterative exercise in balancing contradictory requirements (e.g., high temperature for fluidity vs. low temperature for soundness) using scientific principles and empirical validation.
Ultimately, the investment casting process offers a unique and powerful pathway to manufacture high-integrity, geometrically complex components like this exhaust elbow. Its success hinges on a deep understanding and precise control of the intricate relationships between materials, thermal cycles, and fluid dynamics at every stage of production.