Connecting parts are widely used in highways, railway bridges, tower mast structures, pipeline supports, lifting machinery and other structural connection facilities, compared with traditional welded railings, the pipe joint railings using connectors have superior corrosion resistance; For remote areas, tubular railings are being transported and installed etc. are more convenient . Because of its characteristics of firm connection, quick disassembly and installation, and strong adaptability to different application scenarios, it is widely used in the industrial field. The material of the connection is KTH330-08, where KTH stands for black core malleable cast iron, 330 represents the minimum tensile strength of 330 MPa, 08 represents the minimum elongation after breaking 8%, and its mechanical properties are similar to ASTMA47-32510. The graphite in malleable cast iron is clustered, flocculent, and sometimes a small number of globular, and its cutting damage effect on the matrix is less than that of sheet graphite. Compared with gray cast iron, malleable cast iron has better strength, plasticity, toughness and elongation . According to the matrix structure, malleable cast iron can be divided into ferritic malleable cast iron and pearlitic malleable cast iron, which is commonly used to cast thin-walled parts with complex shapes and environments that need to withstand vibration and shock loads. However, in terms of casting performance, due to the poor fluidity of molten iron, it is easy to produce insufficient pouring and shrinkage holes, and the hot cracking tendency is serious, so that malleable cast iron is not easy to obtain thin-walled castings with complete contours; At the same time, due to the rapid solidification of thin-walled castings, deformation and cracking caused by internal stress are common defects in casting production.
The malleable cast iron connection is cast with sand mold, the shell core material is phenolic resin, and the molding sand is silica sand. During casting production, it was found that the casting had defects such as insufficient pouring and cracks, resulting in a low yield. Therefore, improving the casting process of the connector and improving the yield of the casting [10] are the focus of this research. In this paper, the casting process of the connector is simulated and analyzed by using ProCAST numerical simulation software, and the flow field and temperature field in the casting are obtained by visualizing the filling and solidification process of the casting
Change, analyze the causes of insufficient pouring of castings ; By studying the influence of the residual indenter, pouring temperature and riser position on the filling and solidification process of castings, a set of optimal casting process design scheme is finally formed. At the same time, the stress and deformation of the casting during the solidification process are simulated and analyzed, and it is predicted that the casting will not produce a large strain concentration and deformation under the production process conditions, so as to ensure that the casting is not easy to crack due to internal stress during the subsequent heat treatment and correction process.
1 Connection casting process design
1.1 Part structure and material
Connection 157 mm long, 100 mm wide, 120 mm high, 8 mm wall thickness, 7 mm thick base, 4 hollow bosses of uniform size on one side, a 13 mm diameter penetration hole on the end face, a thin-walled structure with multiple mutations from thin walls to thick walls, the part structure is shown in Figure 1.
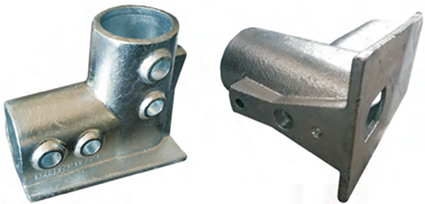
Fig.1 Part drawing of the connector
The connector is made of KTH330-08 and the chemical composition is shown in Table 1. Its liquid temperature is 1 247 °C and the solid temperature is 1 151 °C. 50% scrap and 50% recycled material are melted through an intermediate frequency induction furnace Molten metal is melted and a recarburiser is added to adjust the carbon content. The iron output temperature is about 1 480~1 520 °C, and bismuth-aluminum is added to the bottom of the pouring package for composite inoculation treatment before the pouring furnace is released, which promotes the formation of cast white mouth structure and shortens the annealing time.
| 元素 | C | Si | Mn | S | P |
| 含量 | 2.6~2.8 | 1.4~1.6 | 0.4~0.6 | ≤0.18 | ≤0.12 |
1.2 Preliminary design of casting process
For easy molding and core making, the pouring position and parting surface of the connection are shown in Figure 2. The parting surface is placed at the maximum section of the casting, and the pouring position is selected to match the parting surface.
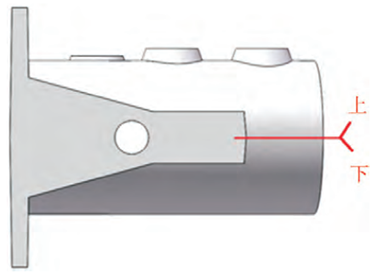
Fig.2 Parting surface of the connector
The gating system is the channel for molten metal to enter the cavity, and its design depends on the casting structure, technical characteristics, alloy type, gating system structure type and molten metal introduction location. For malleable iron castings, the molten iron mostly enters the cavity through straight runners, cross runners, and dark risers. For the cross-sectional area of the inner runner in the gating system, the following equation is proposed based on the simplified combination of the hydrodynamic calculation formula, combined with practical experience and actual production:
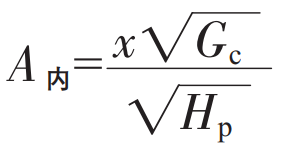
where A is the cross-section of the inner channel, cm2; GC is the casting quality,kg; Hp is the average static pressure head height, mm; x is the empirical coefficient. To increase the capacity of the foundry’s connections, a two-piece casting process was used, so the total mass of the pouring system and the castings was approximately 5.14 kg. According to the design principles of closed gating systems, straight runners, cross runners,The cross-sectional areas of the inner gating are 228, 171, 114 cm2, respectively. Foundry The preliminary design scheme is shown in Figure 3(a).
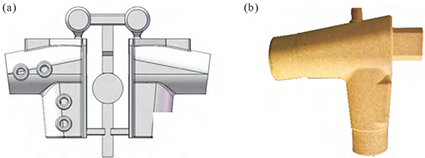
Sand core is mainly used to form the inner hole of the casting, cavity and some parts that are not easy to mold and sand out, the design should be considered to minimize the number of sand cores, complex sand core should be manufactured in blocks Reasonable design of sand core shape
, the sand core box surface and the parting surface are as consistent as possible, which is convenient for the principle of core clamping. The sand core relies on the core head to set and fix the sand core in the sand mold, for this sand core, the center of gravity of the sand core and the line of action of the buoyancy force need to be set on the edge of the core head, so 3 core heads need to be designed. The size of the core head is related to the casting process used and depends on the size of the hole groove in the corresponding part. The sand core is produced using the hot core box process, and the shape of the core head is determined by the bottom hole and the shape of the cylinder, which is two rings and an approximately oval core head. According to the process design principle, the length of the larger diameter cylindrical head is 70 mm, and the length of the smaller diameter cylindrical head is 35 mm. The core structure is shown in Figure 3(b).
1.3 Numerical simulation and process improvement
Simulation in the casting process design stage can save a lot of time and cost, help foundry engineers quickly find the shortcomings in the casting process; It is of great significance to reduce the number of production trial production and quickly formulate a reasonable casting process. The pouring temperature was set to 1 350 °C, and the initial temperature of the casting and mould was set to 20 °C. The casting material is silica sand, and the core material is phenolic resin sand. For coagulation
For the heat transfer system for the solid process math model, refer to HTC Recommended Values in the ProCAST User Manual to set the heat transfer coefficient between the casting and the mold to 600 W/m2
· K, the heat transfer coefficient between the mold and the air is 10 W/m2· K。
The numerical simulation results show that there are macroscopic shrinkage holes at the connection between the solidified connection base plate and the inner sprue, as shown in Figure 4. When the gating system is removed, this defect will cause meat shortage on the surface of the casting, resulting in rejects. Therefore, the casting process needs to be improved to eliminate defects by adding risers. The design of the riser of cast iron parts should be based on the characteristics of post-shrinkage and graphite phase change expansion and self-shrinkage of the pouring system, and the difference between molten iron after shrinkage and insufficient self-shrinkage is compensated by adding risers. The new casting process is shown in Figure 5.
1.4 Analysis of trial production defects of new casting process
After the trial production of the above casting process, it was found that there was a defect of insufficient pouring at the boss of the connector. The defect was difficult to remedy, resulting in the casting being scrapped directly. Insufficient pouring generally appears in the upper part of the casting, and the incomplete part is a smooth semicircle. The cause is usually insufficient amount of molten metal in the pouring bag or too fast pouring speed, and the molten metal overflows from the straight sprue or riser, resulting in premature pouring. This defect generally occurs in the upper part of the casting away from the gate. It can be seen from Figure 6 that the under-casting defect mainly occurs in the convex cylinder wall facing upwards when the connection is poured, and the other side corresponding to the same height does not have such defects. The preliminary analysis shows that due to the thin-walled structure of the casting, the temperature at which the molten metal arrives here is low, the fluidity is weakened, and the hindering effect of the boss sand core there makes the casting appear poured there
Foot defects.
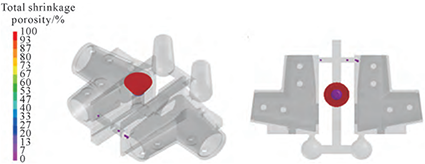
Fig.4 Shrinkage hole distribution of the connector using the preliminary design of casting process
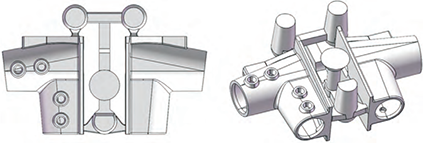
Fig.5 The improved casting process scheme
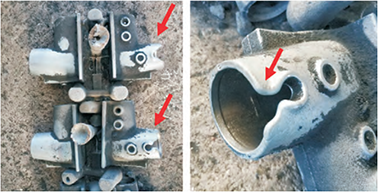
Fig.6 Insufficient pouring defects in connectors
2 Optimization of new casting process parameters
The following is to solve the insufficient pouring defect by increasing the remaining indenter head, increasing the pouring temperature, and adjusting the position of the dark riser, and select the best solution.
2.1 Remaining indenter
The residual indenter ensures that the molten metal fills the farthest and highest part of the casting from the straight runner, resulting in a well-defined, well-shaped, well-shaped casting. The height from the highest point of the casting to the liquid level in the gate cup must be greater than or equal to the minimum remaining head height hM, i.e. the straight runner must have sufficient height. Due to the existence of more thin-walled structures in the connectors, the temperature of the molten metal will decrease rapidly after flowing into the cavity, resulting in a decrease in fluidity
, there is a structure at the far end of the casting that obstructs the flow of molten metal. Therefore, the minimum indenter of the original design may be insufficient, resulting in insufficient pouring at the far end of the casting, and the length of the straight runner needs to be extended. Considering the specifications of the sand boxes used in the factory, two sets of simulation calculations were designed, and one group used the height of the original straight runner as shown in Figure 7; The other set uses a height 10 mm higher than the original straight runner, as shown in Figure 8.
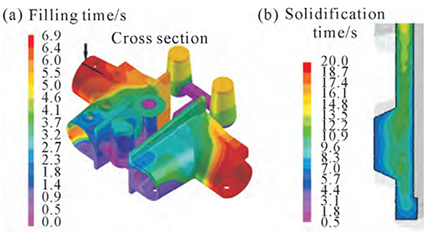
Fig.7 Simulated results under the design of original indenter height: (a) filling time, (b) solidification time at the convex section
Through the simulation analysis of the filling process of the connector, the distribution cloud of the filling time of different parts of the casting is obtained, as shown in Figure 7(a) and Figure 8(a). The color of the color card ranges from purple to red to represent the time when the molten metal fills the position, and red is the position where the molten metal last arrives. After the molten metal enters the cavity, due to the decrease of the casting structure and the temperature of the molten metal, the flow speed of the molten metal decreases, the pressure provided by the pressure head makes the liquid level of the cavity rise slowly, and the boss on the upper surface of the casting is the last filled part of the molten metal
Bit. In the actual production pouring process, due to the continuous decrease in the temperature of the molten metal, the flow of the molten metal stops before reaching the upper surface boss, resulting in the defect of insufficient pouring there. When the indenter is raised, the filling pressure after the molten metal enters the cavity is sufficient, and the liquid level in the mold rises rapidly. The section of the upward-facing connector boss is cut off, and the solidification time after the lengthened straight runner is later than the solidification time of the original straight runner, as shown in Fig. 7(b), fig. 8(b). and
Compared with the height of the original indenter, the molten metal will be filled to the far end of the casting earlier after the straight runner is extended, ensuring that the contour of the casting is clear and the shape is complete.
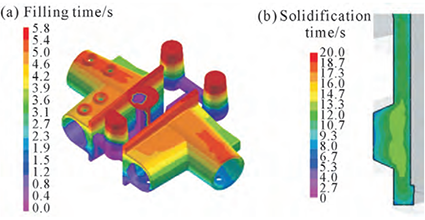
Fig.8 Simulated results after increasing the indenter height:(a) filling time, (b) solidification time at the convex section
2.2 Pouring temperature
In casting production, increasing the pouring temperature can ensure that the molten metal has better fluidity, which is conducive to the aggregation and floating of inclusions, and reduces the occurrence of pores, slag inclusions and other defects in the casting. But if the pouring temperature is too high
High, the surface quality of the casting will be affected. Excessively high pouring temperatures will be added
The evaporation of water in the mold and the combustion of organic matter produce a large amount of gas. At the same time, the molten metal is more likely to react with the mold material to form a complex, which will eventually cause porosity or sand entrapment on the surface of the casting [16]. For the thin-walled structure of castings and the production of foundries, 1 350,
1 360, 1 370, 1 380 °C 4 pouring temperature control groups. Due to the thin-walled structure of the connector, the molten metal cools quickly after entering the cavity. With the decrease of the temperature of the molten metal, the solid phase fraction increases, and the filling capacity of the molten metal weakens, making it difficult to fill the cavity, which is easy to cause insufficient pouring and cold partition defects. The change of KTH330-08 solid-phase fraction with temperature is shown in Figure 9. When the temperature of the molten metal is lower than 1 159 °C, as the temperature decreases, the solid phase fraction of the molten metal rises rapidly, and its fluidity decreases sharply. When the temperature of molten metal is higher than 1 159 °C, the solid phase rate of molten metal is small, and the fluidity of molten metal is better. When the temperature of the metal liquid is lower than 1 159 °C, it is approximately considered that the molten metal has lost its fluidity. from
From the perspective of casting structure, the structure of both sides of the upper surface of the casting is different. On one side is a hollow boss structure, on the other side is a smooth surface. When the metal liquid solid phase fraction increases, the fluidity decreases. At the same time, the molten metal filling mold is hindered by the sand core, and it is not easy to obtain castings with complete contours.
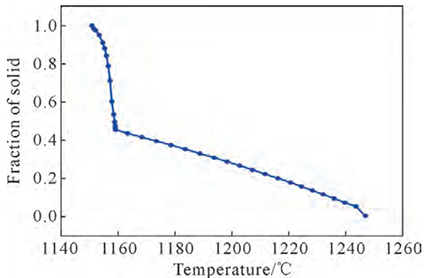
Fig.9 The relationship between solid fraction and temperature of KTH330-08
Select the casting prone to undercast defects (Figure 10(a)), by extracting the temperature of the point when it is filled at different pouring temperatures, the solid phase fraction of the molten metal at this moment is obtained, and whether pouring will occur there is predicted
Deficiencies and defects. When the pouring temperature is 1 350 °C, the molten metal is filled to cast
At the distal end of the upper surface, as shown in Figure 10(a), the point is extracted to a temperature of 1 158°C. According to the solid fraction change curve, the solid phase rate is 53%, most of the molten metal has solidified, and it basically loses its fluidity. When the time of subcontracting or continuous pouring in the casting production process is too long, the actual pouring temperature will decrease, and it is easy to reduce the fluidity when the molten metal reaches the far end, and it is impossible to fill the cavity; When the pouring temperature rises to 1 360 °C, as shown in Figure 10(b), the molten metal temperature of each part of the casting increases to a certain extent. At this time, the temperature at the extraction point of the molten metal is 1 163 °C, and the solid phase rate is 42.3%. The molten metal has a certain fluidity, and it can fill the cavity smoothly under the action of the indenter; When the filling temperature is At 1 370 °C, as shown in Figure 10(c), the temperature at the extraction point is 1 173 °C, and the solid phase rate is 39.2%; When the pouring temperature is increased to 1 380 °C, as shown in Figure 10(d), the temperature of each part of the casting increases significantly, the temperature at the extraction point is 1 186 °C, and the solid-phase rate is 35%. Figure 11 shows the end of the filling at different pouring temperatures for the connector
The solidification time cloud of the section at the upper boss analyzes the solidification process after the molten metal enters the cavity as the basis for improving the process. In Figure 11, when the molten metal is poured at 1 350 °C, the molten metal at the boss solidifies almost immediately after filling, hindering the earlier solidification of the metal on the profile wall
The molten metal continues to fill the cavity, especially at this time, the temperature of the molten metal is already very low, the solid phase rate is high, the fluidity is seriously reduced, and it is easy to have insufficient pouring and cold insulation defects. With the increase of the pouring temperature, the temperature of the molten metal reaching the position increases at the same time, and the solidification time is prolonged, which is conducive to the molten metal
Continue to fill the cavity. It can be seen from Figure 9 that when the temperature of the molten metal is greater than 1 160 °C, the solid phase fraction change curve tends to be flat as the temperature of the molten metal rises. composed
Therefore, it must be ensured that the solid-phase fraction of the molten metal is less than 0.5% when filling the far end of the casting, i.e. the temperature of the molten metal at this point is above 1 160 °C. Therefore, in order to avoid insufficient pouring and cold insulation defects at the connection boss, the pouring temperature should be selected as (1 370±5) °C.
2.3 Riser location
Adding a riser near the place where the casting is prone to under-pouring will provide sufficient filling pressure for the molten metal and reduce the tendency of under-pouring. However, the addition of new risers will reduce the yield of the casting process and increase production costs. Therefore, consider achieving the same purpose by adjusting the riser position, the riser position
The adjustment scheme is shown in Figure 12.
Figure 13(a) shows the filling time distribution of different parts of the casting after the riser position adjustment, and it is found that after changing the riser position, the inner gate is far away from the straight runner, and the straight gate cannot provide sufficient charge for the flow of molten metal
type pressure. At the same time, Figure 13(b) shows that when the riser position is adjusted, the original solidification order of the casting will be changed, and a shrinkage defect will be generated at the original inner gate. Compared with the original casting process, it is more detrimental to the quality of the casting. Therefore, adjusting the riser position is an improper casting process improvement measure. Through the comprehensive analysis of the simulation results of the three improvement measures of adjusting the residual indenter, pouring temperature and riser position, it is an effective way to eliminate the defects of insufficient pouring of connecting parts by increasing the height of the remaining indenter and increasing the pouring temperature.

Fig.10 The temperature distribution of the casting at the end of filling at different pouring temperatures: (a) 1 350 ℃, (b) 1 360 ℃,
(c) 1 370 ℃, (d) 1 380 ℃

Fig.11 The temperature distribution of the cross section of the casting boss at the end of filling at different pouring temperatures:
(a) 1 350 ℃, (b) 1 360 ℃, (c) 1 370 ℃, (d) 1 380 ℃
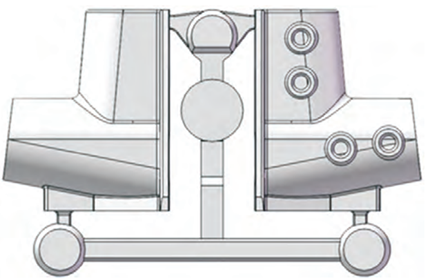
Fig.12 Adjustment scheme of the riser position

Fig.13 Simulation results after adjusting the riser position: (a) filling time distribution cloud map, (b) shrinkage porosity defect cloud map
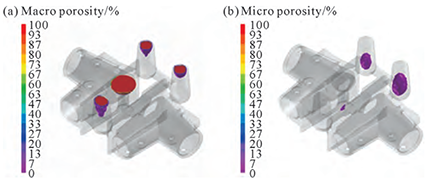
Fig.14 Shrinkage distribution of the new casting process: (a) shrinkage distribution cloud map, (b) shrinkage distribution cloud map
3 Shrinkage and internal stress prediction of new casting process
3.1 Simulation analysis of shrinkage holes and shrinkage of castings
During the solidification process of the casting, if the shrinkage system is not properly designed, shrinkage holes will be formed at the hot joint. According to its distribution characteristics, it can be divided into concentrated shrinkage holes and dispersed shrinkage holes, and the fine and diffuse distribution of shrinkage holes is called shrinkage loose. Castings with severe shrinkage are prone to cracks during solidification and heat treatment. Shrinkage loosening is formed in the late stage of casting solidification, due to the rationality of the selection of residual metal process parameters at this time.
3.2 Simulation analysis of internal stress in castings
In the process of solidification cooling, sand cleaning, heat treatment, repair welding, handling and machining of castings, when the casting structure design or treatment process is improper, the casting will be deformed or cracked under the comprehensive action of temperature, external force and internal stress, so that the size of the casting does not match the drawing or lead to the casting
Scrapped [20]. In the solidification cooling stage of the casting, due to the different cooling rates of each part of the casting and the resulting difference in microstructure transformation, the shrinkage of the casting is hindered, and finally the internal stress is generated inside the casting. In thin-walled castings with complex structures, each part of the casting is fixed quickly due to the rapid solidification of the casting as a whole
The short solidification and phase change times will generate large internal stresses inside the casting. When the internal stress exceeds the tensile strength of the material at the current temperature, cracks will occur inside the casting. The connectors are generally thin-walled hollow structures with uneven wall thicknesses. During the solidification process, a large internal stress will be generated in the casting, which may cause deformation or cracking of the casting. Since the parts are not allowed to be repaired welded, the cracked castings will be scrapped directly. Therefore, castings need to be condensed before mass production
The stress simulation analysis of the solid process was carried out to explore the stress and strain of the solidification process of the new casting process under the selected process parameters, which is of great significance for the quality control of castings under mass production.
During the solidification process of the casting, its internal stress distribution will continue to change with temperature. The stress distribution was analyzed by selecting the two time nodes 60 and 1 000 s after filling, as shown in Figure 15~16. When 60 s after filling, the overall solid phase volume fraction of the casting is close to 88%, and the casting is basic
Solidification, only part of the molten metal is present at the riser and gate socket. As can be seen from Figure 15, the internal stress in the casting is small at this time, and the maximum stress is located at the inner gate, and its value is 60 MPa. When 1 000 s after filling, the casting has cooled to about 200 °C, and the internal stress at the connection of each sprue is the largest, and its value is about 200 MPa, as shown in Figure 16, most of the stress of the casting
Below 40 MPa, the internal stress at the connection between the cylinder wall and the bottom plate is large, and its value is about 106 MPa. At the inner gate, the stress value reaches 160 MPa. The casting material is KTH330-08, and its tensile strength with temperature curve is higher than the maximum stress in the solidification process of casting.
As a result, castings do not crack due to internal stresses during production. join
The simulation analysis of the joint deformation is shown in Figure 17, the deformation of the cylinder wall is large, and the deformation at the barrel mouth is about 2 mm. Since the castings are made of malleable cast iron, they have a certain plasticity, and the deformation can be corrected by subsequent correction.
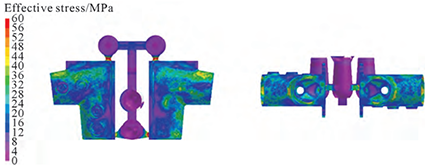
Fig.15 Stress distribution 60 s after filling
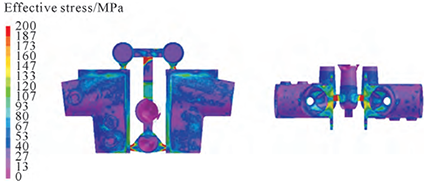
Fig.16 Stress distribution 1 000 s after filling
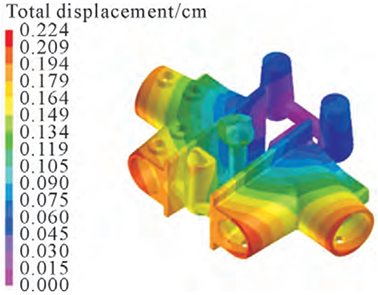
Fig.17 Deformation distribution at the end of solidification of castings
4 Conclusion
(1) When the height of the straight runner is increased by 10 mm, the molten metal is filled
The process is smoother and flows faster into the connecting cylinder boss.
(2) When the pouring temperature is (1 370±5) °C, when the molten metal is filled
The fluidity is better, and it can still be smooth to reach the defect that is prone to insufficient pouring
Full of cavities. (3) The shrinkage hole and stress strain of the new casting process were simulated and analyzed, and most of the stress values of the castings after solidification were lower than 40 MPa, and the internal stress at the connection between the cylinder wall and the bottom plate was large, and its numerical value was about 106 MPa.
