During the molding process of castings, various defects may occur, including shrinkage porosity, hot cracking, porosity, insufficient pouring, iron inclusion, and sand drop. This article aims to analyze the possible defects such as shrinkage, porosity, hot cracking, and clamping during the manufacturing process of thin-walled exhaust pipe castings.
Shrinkage and porosity defects and their causes
When the casting solidifies, due to the shrinkage of the alloy’s volume, pores will appear at the final solidification position , and the body of the shrinkage cavity The area is large and densely distributed, while the volume of shrinkage is small and dispersed. The occurrence of this shrinkage porosity defect is mainly due to casting The temperature and pressure changes during the solidification process of the workpiece, as well as other external environmental factors, are caused by the hot spot (pouring)
The area where the system is combined with the casting, which is usually the final solidification, is most prone to forming shrinkage porosity and shrinkage porosity defects, resulting in shrinkage porosity and shrinkage porosity Defects are a complex process that involves numerous influencing factors, including the thermal properties of alloys, temperature changes, and branching The growth status, structural morphology, external pressure, etc. of crystals. As the metal solidifies, the volume contraction of the liquid metal and liquid-solid interface becomes a key factor in forming a contraction cavity. During the solidification process of alloys, the density of the liquid phase is significantly lower than that of the solid phase, dendrites form a framework, and the macroscopic replenishment channels are blocked When blocking, the liquid surrounded by dendrites will be separated, and during solidification, it cannot be replenished in time, resulting in shrinkage porosity. however When the feeding channel is not blocked and the dendrites do not form a skeleton, the liquid isolation generated by the upper part of the flowable unit of the casting The domain is closed, and in this case, shrinkage pores will form.
Hot cracking defects and their causes
When using high-temperature alloys to manufacture thin-walled castings, if the stress experienced at a certain point on the casting exceeds the maximum material The yield limit may lead to the generation of thermal cracks. Hot cracks usually occur at the end of casting solidification, at the crack opening
The cross-section is very rough, and from a microscopic perspective, they are caused by intergranular fracture. Hot cracking is a process of producing thin-walled castings One of the main flaws in the process. Hot cracking often occurs at the “weak point” of the casting, and the “weak point” is more likely to occur on the casting wall The internal corners of the connection, the inlet of the pouring system, and other local temperature exceeding points.
Iron clip defects and their causes
Sandwich is also one of the common defects in the casting of complex thin-walled parts. Due to the high temperature of the poured alloy liquid, insufficient fire resistance of the coating and sand, thin coating thickness, insufficient adhesion between the wax mold and molding sand, and incomplete drying of the mold shell in narrow areas, all of these can cause the alloy liquid to leak from the coating during the casting process, ultimately forming iron clad sand defects.
Research content of investment casting
The original manufacturing methods for exhaust pipe bends used in high-power engines include investment casting, mechanical processing, welding, etc The combination of multiple technologies is very cumbersome, resulting in long production cycles, high costs, easy deformation of castings during welding, and surface quality of products Due to issues such as poor quality, we now plan to improve the manufacturing method and use integral investment casting to form the entire exhaust pipe, achieving near net completion Form. Using a combination of computer numerical simulation and experimentation, analyze the causes of defect formation, optimize process parameters, and ultimately Tested qualified exhaust pipe castings and summarized a new investment casting process for exhaust pipe (integral casting). specific The research content is as follows:
(1) Analyze the structural characteristics of the exhaust elbow, establish a three-dimensional model of the casting blank, and summarize the research route. brief Analyze the alloy materials used for exhaust pipe bends, design multiple pouring system schemes, and combine material characteristics and experience analysis to confirm Determine the initial pouring process parameters.
(2) Simulation results of exhaust pipe group tree models for different pouring systems, analysis of temperature during filling and solidification processes Changes in temperature field, flow field, and solid fraction; Statistically analyze the distribution and volume size of shrinkage porosity in castings, as well as the heat transfer in the “weak points” of castings Crack situation, analyze the reasons for the influence of different pouring systems on defects, and combine experimental and simulation results under initial parameters Compare and analyze to select the optimal exhaust pipe pouring system.
(3) Further simulation analysis of different pouring parameters on castings based on the selected optimal exhaust pipe pouring system scheme The influence of shrinkage porosity and hot cracking defects, optimization of pouring parameters, and ultimately determination of a set of optimal parameters.
(4) Apply the determined optimal pouring system and parameters to the actual production of investment casting for exhaust bend pipe castings, and evaluate the results The castings produced are subjected to dimensional, visual, and internal quality inspections, resulting in the production of qualified exhaust elbows and the summary of investment casting New technology.
Structural analysis of castings
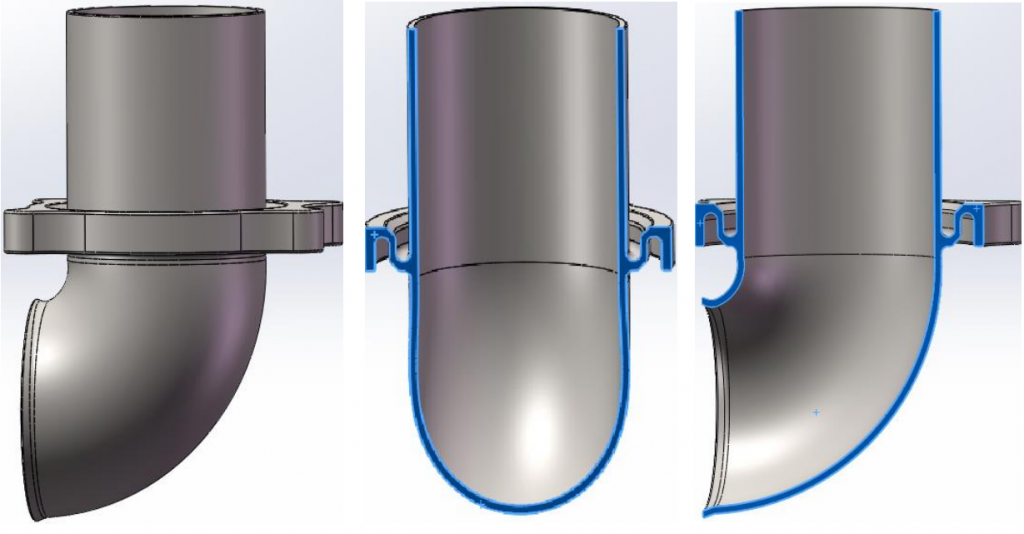
Analyze the product drawing of the exhaust bend pipe, as shown in Figure 2.1, and use Solidworks 2018 3D software to establish the 3D and sectional views of the exhaust bend pipe casting blank. Among them, 2.1 (a) is a three-dimensional diagram of the casting blank. In order to facilitate the observation of the internal structure of the flange and bend, the three-dimensional diagram of the exhaust bend blank is cut from different directions. As shown in Figure 2.1 (b) and (c), they are the side and front sectional views of the casting blank, respectively.

Figure 2.1 Three dimensional blank diagram and sectional view of exhaust pipe casting
In Figure 2.1 (a), the overall structure of the casting can be seen, and the basic dimensions of the blank of the exhaust elbow casting are:
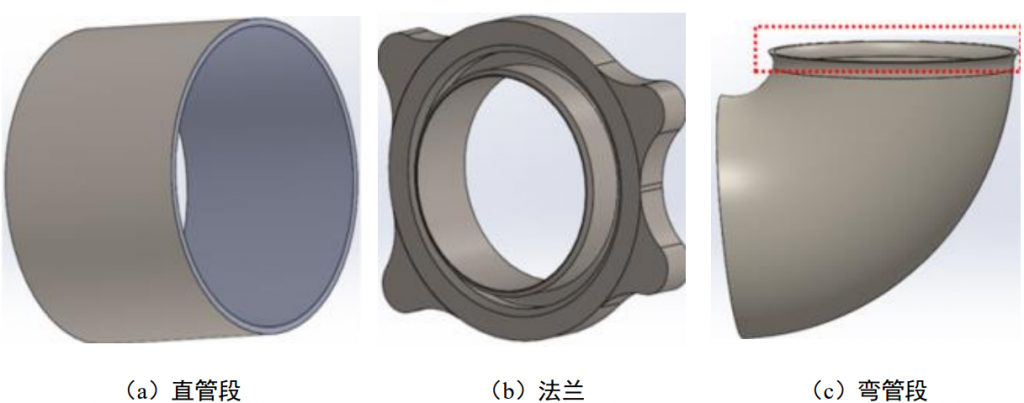
217mm × 150mm × 120mm, the whole can include three parts: straight pipe, flange, and bent pipe. The specific structural characteristics are shown in Figure 2.2 The blank diagram of each part of the exhaust elbow is shown in Figure (a): The length of the straight pipe is 93mm, and the outer diameter is ∅ 90mm × Inner diameter ∅ 87mm, maximum The main feature is that the pipe wall is relatively thin, with an average wall thickness of 1.5mm; The thickness between the two end faces of the flange in Figure (b) is 16mm, and it is on both sides Each has an annular groove with a depth of 13mm, and the width of the annular groove is less than 6mm. The flange aperture is ∅ 91mm. In addition, two The wall thickness between the circular grooves shall not exceed 2.5mm. Considering the convenience of wax removal in investment casting, a three-dimensional blank drawing shall be established Set the annular grooves on both sides of the flange with a draft angle of 1mm; The average wall thickness of the bent section in Figure (c) is also less than 2mm, The curvature of the entire bend is about 90 °, and at the end of the bend, there is a bell mouth shape that is 20 ° outward, indicated by a red dashed line in the diagram
Circle. Under the original manufacturing process, straight pipes, flanges, and bent pipes are connected together by welding. We need to carry out overall melting now Mold casting requires consideration of size transition issues due to different sizes at the connection points of straight pipes, flanges, and bent pipes.

Blank drawing of various parts of exhaust bend pipe
The exhaust pipe bend shown in Figures 2.1 and 2.2 is an important exhaust component inside the engine, which is used for a long time in high temperature and pressure In the environment, and due to its complex structure, it is mostly composed of curved surfaces, and from the technical requirements of the product drawings, it can be seen that for castings The quality requirements for the flange are relatively high. Considering the flatness of the end face during assembly and the convenience of mold removal, only the two and four end faces of the flange will be removed Supraauricular Φ The 11mm hole is machined using mechanical processing, therefore, by consulting the mechanical design manual and investment casting manual, it is determined that the exhaust bend Add 3mm margin to the upper and lower end faces of the pipe flange, and the remaining parts are cast as a whole without margin. Casting the exhaust pipe as a whole During the manufacturing process, there may be many casting defects, such as the exhaust pipe bend, which is prone to heat formation at the end of casting solidification
Crack defects. However, if the exhaust pipe casting meets the technical requirements specified on the drawing, it is considered qualified. The following are the technical requirements specified on the exhaust pipe drawing:
l. The casting is fully filled and does not allow for obvious shrinkage, penetrating defects, or severe defects.
- The surface of the casting should not have defects such as scratches, beans, lack of flesh, cracks, etc.
To ensure the quality of the parts, the size of the shrinkage must not exceed 2mm, and the number of shrinkage must not exceed 3,
Moreover, the spacing between the shrinkages must be greater than the sum of the diameters of the mixed shrinkages. In addition, there must be no air holes or their presence inside the parts
He is flawed.
