
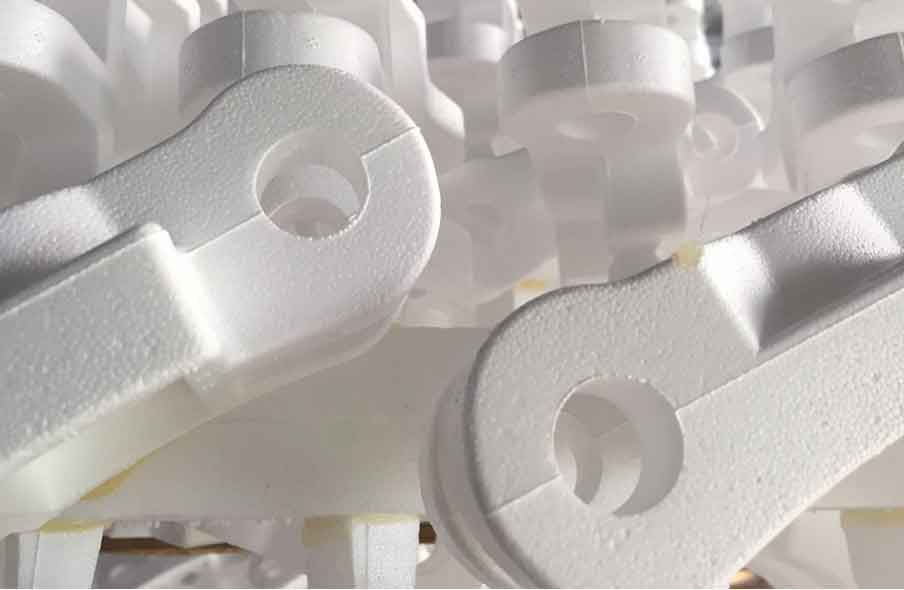
The lost foam casting method takes foamed plastic expandable foam polystyrene or polymethylmethacrylate as the model, and applies fire-resistant coating on the surface of the model. After the coating is dry, it is embedded in binderless dry sand for vibration modeling. Without taking out the model, it is poured with liquid metal. The foamed plastic is heated and decomposed under the action of liquid metal, and the decomposition products escape through the coating mold interface, A casting method in which liquid metal replaces the position of the mold to form a casting with exactly the same shape as the mold.
According to the characteristics of lost foam casting in application, it can be divided into two periods or two methods.
1.Old lost foam casting method
It is mainly used to produce single piece, small batch, large and medium-sized castings. The main typical parts are automobile cover molds, machine tool beds, marine accessories, etc. the foam plastic molds are manufactured by mechanical processing or manual processing, and the molding sand is mainly self hardening sand containing various binders.
2.New lost foam casting method
It is mainly used to produce large batch and small castings. The main typical parts are engine intake and exhaust manifold, cylinder block, cylinder head, cylinder head, motor shell, crankshaft, camshaft, various special-shaped pipe fittings, grinding balls, brake discs, valves and gear boxes, etc. the model is made in large quantities by foaming molding method, and the modeling is the third generation physical modeling method of binder free dry sand.
The lost foam casting process has a series of incomparable advantages over traditional casting processes because it uses dry sand without binder, has no sand core, and does not require mold lifting, box closing, etc.:
(1) The dimensional accuracy and surface quality are significantly improved. There will be no dimensional deviation caused by box splitting, mold lifting, mold repair, lower core, box closing, etc. the compactness of the mold is high, and there will be no dimensional deviation caused by the movement of the mold wall. The castings have no seams, parting surfaces, core assembly and segmentation surfaces, and the draft angle is very small, which not only reduces the cleaning workload, but also greatly improves the appearance quality of the castings, and can produce castings with almost no margin.
(2) The production cost of castings is reduced. It is manifested in the reduction of material costs, sand treatment costs, cleaning costs, machining costs, operator costs and equipment depreciation costs. Generally speaking, it can be reduced by 20%-40% compared with traditional sand casting.
(3) Equipment investment and land occupation decreased. Because the huge sand treatment system and the core making workshop are removed, the molding and molding equipment are simple, and the cleaning process is reduced, the process flow of lost foam casting is greatly simplified, and the equipment investment and floor area under the same productivity conditions are greatly reduced, which can generally be reduced by 25%-50%.
(4) The freedom of product design is large. The parts with complex structure can be cast into a whole through piecewise mold assembly, which makes the product design more flexible and improves the overall performance of the product at the same time.
(5) Reduce labor intensity and improve working environment. Foamed plastic pattern has low density, easy processing and handling, low labor intensity and good working environment.
Chapter 1: Production of Lost Foam Casting with Lost Foam Mold
Creating a lost foam mold for lost foam casting involves several steps, including creating a three-dimensional model, selecting a suitable material for the mold, and using appropriate manufacturing methods such as 3D printing or CNC machining. Here’s a general guide to help you create a lost foam mold using a three-dimensional model:
Step 1: Create a Three-Dimensional Model:
- Design the Part: Create a three-dimensional CAD model of the part you want to cast. Ensure that the model accounts for the foam pattern’s expansion during casting.
- Add Gating and Risers: Incorporate gating systems (channels for molten metal to flow) and risers (reservoirs to feed molten metal) to the model. These components are crucial for a successful casting process.
Step 2: Select Mold Material:
Choose a suitable material for the lost foam mold based on factors such as temperature resistance, mold stability, and compatibility with the casting material. Common options include:
- Expanded Polystyrene (EPS) foam: Typically used for low-temperature casting.
- Ethylene-Vinyl Acetate (EVA) foam: Suitable for higher-temperature casting.
- Other soluble materials: Some manufacturers use soluble wax or other materials that dissolve when exposed to certain solvents.
Step 3: Manufacturing the Mold:
Depending on the selected material, you can use various manufacturing methods to create the lost foam mold:
- 3D Printing:
- Use 3D printing technology to directly print the foam pattern of the mold.
- Choose a 3D printer and material compatible with the desired mold material (e.g., EPS or EVA foam).
- CNC Machining:
- If using harder foam materials, such as EVA, CNC machining can be employed to precisely shape the mold.
- Create toolpaths in CAM software to guide the CNC machine in cutting the foam material.
- Manual Shaping:
- For simpler shapes, the foam pattern can be manually carved or shaped using hand tools.
Step 4: Assemble the Mold:
Assemble the foam pattern components, including gating and riser systems, to create a complete foam mold that replicates the final casting.
Step 5: Coating (Optional):
Apply a thin refractory coating to the foam mold’s surface. This helps improve surface finish, dimensional accuracy, and aids in mold stability during casting.
Step 6: Casting:
Proceed with the lost foam casting process by pouring molten metal into the mold. The foam pattern will vaporize due to the heat of the molten metal, leaving behind the cavity that defines the final casting.
Step 7: Post-Casting:
After the casting has solidified and cooled, remove the mold material residues and perform any necessary finishing operations on the cast part.
It’s important to note that lost foam casting requires careful consideration of factors like pattern design, gating and riser design, mold material selection, and manufacturing method. The specific details of each step may vary based on your project’s requirements and the capabilities of the chosen manufacturing methods and materials.
Chapter 2: The Wax Pattern Production in Lost Foam Casting
Using wax or other soluble materials to create molds is a key characteristic of the lost foam casting process. This process involves creating a pattern or mold using materials that will later be vaporized or dissolved, leaving behind a cavity into which molten metal is poured. Here’s an overview of the steps involved in creating a wax mold using lost foam casting:
1. Pattern Creation:
- Develop a three-dimensional CAD model of the desired part you intend to cast.
- Use this CAD model to create a pattern or mold of the part. This pattern can be made from various materials, with wax being a common choice due to its easy handling and vaporization properties.
2. Wax Injection:
- Inject molten wax into the mold cavity, filling it completely. The wax will take on the shape of the final metal part.
- Allow the wax to cool and solidify within the mold.
3. Pattern Assembly:
- Attach gating and riser systems to the wax pattern. These channels will allow the flow of molten metal and provide feeding reservoirs during casting.
4. Refractory Coating (Optional):
- Apply a thin refractory coating to the wax pattern’s surface. This coating enhances the surface finish of the final casting and helps improve mold stability during casting.
5. Cluster Formation:
- Assemble multiple wax patterns (with gating and riser systems) onto a central sprue to form a pattern cluster.
6. Sand Encasement:
- Surround the entire pattern cluster with a fine, unbonded sand called “flask” or “backing sand.” This sand serves as both the mold material and the insulating material during the casting process.
7. Molten Metal Pouring:
- Heat the mold to a high temperature, causing the wax pattern to vaporize or burn out completely. The resulting cavity corresponds to the shape of the original wax pattern.
- Pour molten metal into the cavity, which fills the void created by the vaporized wax.
8. Casting Solidification:
- Allow the molten metal to cool and solidify within the mold cavity.
9. Shakeout and Cleaning:
- After the metal has solidified and cooled, break apart the sand mold (shakeout) to reveal the cast metal part.
- Remove any remaining sand or refractory material from the cast part through cleaning and finishing processes.
The use of wax patterns in lost foam casting offers the advantage of creating intricate and complex shapes without the need for complex tooling. It is a versatile method that allows for efficient production of metal parts with near-net shape and minimal machining requirements.
Chapter 3: Assemble Multiple Lost Foam Casting Molds into Whole
Assembling multiple lost foam casting wax molds into a single structure is commonly referred to as a “wax mold tree.” This tree structure holds several individual wax patterns or molds, each representing a specific part to be cast. Creating a wax mold tree offers several advantages in the lost foam casting process:
1. Efficiency in Casting:
- Multiple wax patterns can be cast in a single pour, increasing the casting efficiency.
- The tree structure allows for multiple parts to be cast simultaneously, reducing production time.
2. Economical Use of Resources:
- Using a single gating and riser system for the entire tree optimizes the use of molten metal, reducing waste.
3. Consistent Gating and Feeding:
- The tree design ensures consistent gating and riser placement for each individual mold, promoting uniformity in casting conditions.
4. Reduced Material Handling:
- Handling and transporting multiple molds can be more manageable when organized on a single tree structure.
5. Improved Heat Dissipation:
- The spacing between molds on the tree helps dissipate heat and prevents excessive heating of adjacent molds during the metal pour.
6. Simplified Process Tracking:
- Having multiple molds organized on a single tree makes it easier to track and manage the progress of each mold throughout the casting process.
7. Reduced Mold Movement:
- The tree structure helps keep individual molds stable during the casting process, minimizing the risk of shifting or misalignment.
8. Streamlined Pouring:
- Pouring molten metal into a single location (the main sprue on the tree) ensures even distribution to all the individual molds.
9. Enhanced Quality Control:
- Inspecting and managing the quality of multiple molds together on a tree can simplify quality control procedures.
10. Improved Workspace Organization:
- The tree structure keeps the workspace organized and helps prevent clutter during the casting process.
Creating a wax mold tree requires careful consideration of the arrangement and orientation of each individual mold to ensure proper gating and riser placement, consistent cooling, and successful casting outcomes. It’s a practical approach that leverages the benefits of lost foam casting while optimizing the production process for multiple parts.
Chapter 4: Packaging and Drying of Lost Foam Casting Molds
You’ve described the process of creating the ceramic or gypsum shell around the lost foam casting wax mold tree in preparation for the final casting. This step is a critical part of the lost foam casting process and is known as “shell building” or “shell formation.” Here’s a detailed explanation of the process:
1. Shell Building Process:
- Coating Application: The wax mold tree is immersed in a slurry of ceramic or gypsum material. This slurry adheres to the surface of the wax patterns, forming a thin layer.
- Refractory Sand Coating: After applying the slurry, the coated wax mold tree is rolled in a bed of refractory sand. This sand adheres to the wet surface of the slurry, creating the initial layer of the shell.
- Drying and Curing: The coated tree is allowed to dry and cure. This first layer hardens, creating a solid base for subsequent layers.
- Repeat Coating: The process is repeated several times, with additional layers of slurry and refractory sand applied, dried, and cured. Each layer adds to the thickness and strength of the shell.
- Uniform Thickness: The goal is to achieve a uniform and consistent shell thickness that can withstand the pressure and heat of the molten metal during casting.
2. Dry the Shell:
- After the desired shell thickness is achieved, the entire shell-coated tree is dried thoroughly to remove any remaining moisture. This is a critical step to prevent steam formation and potential defects during casting.
- Drying methods can include air drying, controlled heating, or a combination of both.
- Proper drying enhances the strength of the shell and ensures that no residual moisture remains that could cause steam-related issues during the casting process.
The ceramic or gypsum shell formed through this process serves as the mold for the lost foam casting. Once the shell is fully dried and cured, the wax within the mold tree is vaporized or burned out during the casting process, leaving behind a cavity that is subsequently filled with molten metal.
The shell building process requires careful attention to detail, proper coating application, and controlled drying to create a strong and reliable mold that can withstand the extreme conditions of the casting process.
Chapter 5: Dewaxing of Lost Foam Casting Mold
Once the ceramic or gypsum shell has been dried and cured, the wax inside the mold is removed through a process known as “dewaxing” or “burnout.” This step leaves behind a hollow cavity that will be filled with molten metal during the casting process. Here’s an overview of the dewaxing process:
1. Preheating:
- Before placing the dried shell in the furnace, it’s often preheated to a specific temperature. This helps to gradually remove any remaining moisture and prevents thermal shock when the shell enters the hot furnace.
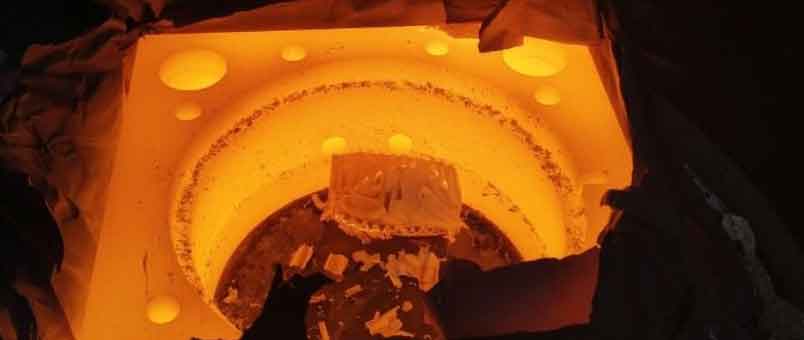
2. Dewaxing in the Furnace:
- The dried and preheated shell is placed in a high-temperature furnace, often referred to as the “burnout furnace.”
- As the furnace temperature increases, the wax inside the shell begins to melt and flow out of the mold cavity.
3. Vaporization of Wax:
- The wax vaporizes due to the high heat, leaving behind an empty space or cavity inside the ceramic or gypsum shell. This cavity is an exact replica of the original wax pattern.
4. Drainage and Venting:
- To ensure complete removal of the wax and prevent any trapped gases from forming, the mold is often designed with specific drainage and venting channels.
5. Proper Ventilation:
- Adequate ventilation is crucial during the dewaxing process to allow the vaporized wax and any gases to escape the mold without causing defects.
6. Clean Shell:
- Once the dewaxing process is complete, the shell should be clean and free of any residual wax.
7. Inspection and Repair:
- After dewaxing, the ceramic or gypsum shell is carefully inspected for any cracks, defects, or irregularities that could affect the final casting.
The dewaxing step is a critical transition point in the lost foam casting process. Once the wax has been completely removed, the now-empty shell is ready to receive the molten metal. The careful execution of the dewaxing process ensures that the final casting will have the desired shape and characteristics.
Chapter 6: Lost Foam Casting Process
Absolutely, you’re describing the crucial steps in the final stage of the lost foam casting process, where the molten metal is poured into the prepared mold to create the desired cast part. Here’s a detailed overview of the casting process in lost foam casting:
1. Preheating the Metal:
- The metal that will be used for casting is preheated to the appropriate temperature. This temperature depends on the type of metal being used and its specific casting requirements.
2. Mold Preparation:
- The dewaxed and cleaned ceramic or gypsum shell, which now forms the mold, is placed in a casting flask or mold box. The mold box is designed to contain the molten metal and support the mold during casting.
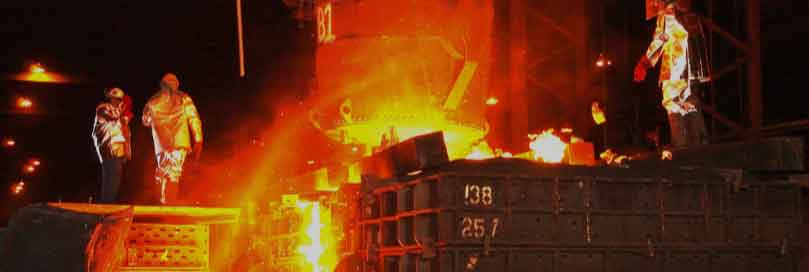
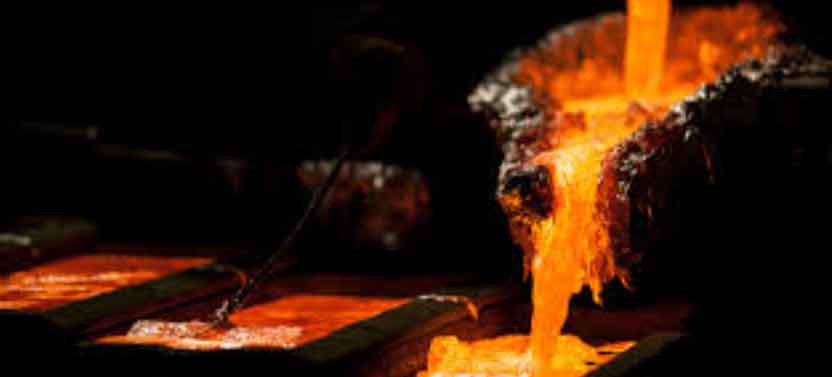
3. Pouring Molten Metal:
- The preheated molten metal is carefully poured into the mold cavity. The molten metal flows to fill the void left by the vaporized wax, taking on the shape of the original wax pattern.
4. Solidification:
- As the molten metal fills the mold cavity, it gradually cools and solidifies. The cooling rate and solidification process can impact the final properties of the cast part.
5. Cooling and Solidification Time:
- The cooling and solidification time is determined by the size and thickness of the cast part, as well as the properties of the metal being cast.
6. Removal from Mold:
- Once the metal has completely solidified and cooled, the cast part is removed from the mold. The ceramic or gypsum shell is often broken away to reveal the final casting.
7. Finishing:
- After removal from the mold, the casting may require additional finishing processes such as grinding, machining, polishing, or heat treatment to achieve the desired surface finish and dimensional accuracy.
The lost foam casting process offers the advantage of creating intricate and complex parts with near-net shape, reducing the need for extensive machining. Proper execution of each step is critical to ensuring the quality and integrity of the final cast part. It’s important to maintain precise control over factors such as metal temperature, mold preparation, pouring technique, and solidification time to achieve successful castings.
Chapter 7: Cooling and Demolding of Lost Foam Casting
The final steps of the lost foam casting process, specifically the cooling, demolding, and removal of cast parts from the tree structure. Here’s a detailed explanation of these steps:
1. Cooling and Solidification:
- After the molten metal is poured into the mold and fills the cavity, it undergoes the process of cooling and solidification. The metal gradually loses its heat and transitions from a liquid state to a solid state.
2. Demolding:
- Once the metal has fully solidified and cooled to an appropriate temperature, the ceramic or gypsum shell that encased the casting is carefully broken away. This process is known as “demolding.”
- Demolding can be done manually by using tools to carefully crack and remove the shell without damaging the cast part.
3. Exposing the Cast Part:
- As the shell is removed, the cast part is exposed. The part now resembles the original wax pattern that was used to create the mold.
4. Removal from Tree Structure:
- If the cast parts were assembled on a tree structure, each individual cast part is carefully cut or broken away from the tree.
- Care is taken to ensure that the individual parts are separated without causing any damage or deformation.
5. Post-Casting Finishing:
- After the cast parts are removed from the tree and demolded, they may undergo additional finishing processes. This can include removing any remaining gating and riser systems, cleaning, machining, grinding, polishing, and any other necessary steps to achieve the desired final appearance and dimensions.
6. Inspection and Quality Control:
- Each cast part is thoroughly inspected to ensure it meets the required specifications and quality standards. Any defects or irregularities are addressed during this stage.
7. Final Product:
- Once the finishing and quality control processes are complete, the cast parts are now ready to be used for their intended application.
The cooling, demolding, and removal processes are critical to ensuring the successful production of high-quality cast parts in lost foam casting. Proper handling and attention to detail during these steps contribute to the overall success of the casting process and the production of accurate and reliable parts.
Chapter 8: Inspection and Quality Control of Lost Foam Casting
Inspection and quality control are essential steps in the lost foam casting process to ensure that the final cast parts meet the design requirements and adhere to quality standards. Here’s an overview of the inspection and quality control process for lost foam castings:
1. Visual Inspection:
- Conduct a visual inspection of the cast parts to check for any surface defects, irregularities, or imperfections. This includes looking for cracks, voids, porosity, or other visible anomalies.
2. Dimensional Measurement:
- Use precision measuring tools such as calipers, micrometers, and gauges to measure critical dimensions of the cast parts. Compare these measurements to the specified tolerances in the design.
3. Non-Destructive Testing (NDT):
- Perform non-destructive testing methods such as X-ray, ultrasound, dye penetrant, or magnetic particle testing to identify any internal defects that may not be visible on the surface.
4. Hardness Testing:
- Conduct hardness testing to assess the mechanical properties and consistency of the cast material. Hardness tests can help identify variations in material properties.
5. Metallographic Examination:
- Cut and prepare samples from the cast parts for metallographic examination. This involves studying the microstructure of the material under a microscope to ensure proper grain structure and integrity.
6. Pressure Testing (If Applicable):
- If the cast parts will be subjected to pressure or fluid flow, perform pressure testing to ensure they can withstand the intended conditions without leakage or failure.
7. Visual and Dimensional Comparison to Design:
- Compare the inspected cast parts to the original design specifications, drawings, and CAD models. Ensure that the final parts match the intended design.
8. Documentation and Traceability:
- Maintain detailed records of inspection results, measurements, testing outcomes, and any defects or deviations found.
- Ensure proper traceability by recording batch numbers, date of production, and other relevant information.
9. Rejection and Rework:
- If any cast parts do not meet the specified quality standards, determine whether they can be reworked or if they need to be rejected and remade.
10. Final Approval:
- Once the cast parts pass all quality control checks, they can be approved for use in their intended applications.
A thorough and systematic inspection and quality control process helps ensure that the lost foam castings are of high quality, have the desired mechanical properties, and meet the functional and safety requirements of their intended use. It’s essential to follow established quality control procedures to deliver reliable and consistent cast parts.
Chapter 9: Subsequent Treatment of Lost Foam Casting
Subsequent treatments can be performed on lost foam casting parts to enhance their performance, durability, and appearance. These treatments can further improve the properties of the cast parts and make them suitable for specific applications. Here are some common subsequent treatments that can be applied to lost foam casting parts:
1. Heat Treatment:
- Heat treatment involves controlled heating and cooling of the cast parts to alter their microstructure, improve mechanical properties, and relieve internal stresses. Different heat treatment processes, such as annealing, quenching, tempering, and solution treatment, can be used based on the material and desired properties.
2. Surface Coating:
- Metal Plating: Applying a thin layer of metal onto the surface of the cast part through processes like electroplating or electroless plating can enhance corrosion resistance, wear resistance, and aesthetic appearance.
- Thermal Spraying: Coating the surface with materials like ceramics, metals, or polymers using thermal spraying techniques can provide additional protection against wear, corrosion, and high-temperature environments.
3. Surface Finishing:
- Grinding and Polishing: These processes can improve the surface finish, remove imperfections, and achieve a smoother, more aesthetic appearance.
- Shot Peening: Inducing controlled compressive stresses on the surface through shot peening can enhance fatigue resistance and increase part lifespan.
4. Machining and Assembly:
- Machining: Further machining operations such as drilling, milling, and threading can be performed to achieve specific dimensions or tolerances.
- Assembly: Cast parts can be assembled with other components to create larger assemblies or systems.
5. Coating and Paint:
- Applying coatings or paint layers can provide added protection against environmental factors, enhance appearance, or provide specific functional properties.
6. Anodizing (For Aluminum Parts):
- Anodizing creates a protective oxide layer on the surface of aluminum cast parts, enhancing corrosion resistance and improving appearance.
7. Stress Relief:
- Stress relief treatments can be used to minimize residual stresses in the cast parts, improving dimensional stability and reducing the risk of cracking.
8. Impregnation:
- Vacuum impregnation can be used to seal porosity in cast parts, improving their integrity and preventing leakage in critical applications.
9. Non-Destructive Testing (NDT) Validation:
- Conducting further non-destructive testing after treatments to ensure the quality and integrity of the treated parts.
Each subsequent treatment is chosen based on the specific requirements of the cast parts and the intended application. These treatments play a significant role in maximizing the performance, longevity, and aesthetic appeal of the lost foam casting parts. Proper selection and implementation of subsequent treatments require a thorough understanding of materials, processes, and desired outcomes.